Monday, September 24, 2018

New Improved Creality CR-10 S4 Filament Sensor Assembly Project

After have used my Creality CR-10 S4 3D printer now for a good portion of this year I have finally gotten around to making one last change (hopefully) to the setup for the printer.  This being the filament out sensor that came with the printer.  There is really nothing wrong with the sensor itself as it does the job very well of letting me know that I need to change filament when I am printer something rather large. The mount for the sensor is designed well enough to make it work but is poorly designed in the way it is mounted to the 3D printer. 

Pictured above is the sensor that is used on my Creality 3D printer. I am sure that this is used on all models of the Creality line and so all the people that use these printers have experienced the same issue with this setup.  At least I assume this is the case.

 In the housing of the sensor there is nothing more than a small switch that is turned on when filament is fed through it to be printed. Once the filament has passed through the sensor the switch is turned off and stops the print.  Great!  Just what I need for my big prints.  But the problem is the flat section of the housing that you see extruding out to the right lower base of the square shaped sensor housing. This flat section is simply slid on to a flat plate on the 3D printer where the extruder stepper motor is mounted.  This is all well and good as long as you do not have a large part to 3D print. 

If you do then the vibration of the machine slowly loosens this assembly to the point where it will eventually come loose and dangle on the filament that is being fed into the printer.  Not a good thing to have happen while printing parts. 


In the images above you can see the computer model I created to show you what this sensor looks like when it is assembled and taken apart.  At the bottom (in yellow) is the mounting for the sensor and the two flat plates that are slid on to the stepper motor mount.  Above this part is the sensor (in black & white) with a little arm to turn on and off the sensor on the left and the connector socket on the right.  Next up is the cover for the sensor (in blue) and finally the screws to secure the cover to the assembly.


To make a more secure mount for the filament out sensor I designed a new assembly as pictured above. The new assembly eliminates the lower portion of the original mount and replaces it with a taller rectangular base that is attached to the 3D printer using 10-32 bolts that are 2 1/2 inches long with additional locking nuts.  These bolts replace the bolts that hold the rollers for the "Z" axis of the printer on the left hand side of the machine. 


I saved the original top cover and mounting screws for the new assembly along with the sensor switch needed to make this all work.  In the image above you can see these parts along with the 10-32 bolts and nuts and two small spacers (in red) that allow clearance for the assembly to keep it  away from the stepper motor  that is used for the "X" axis on the machine.  Another thing that took me some time to get designed right was the upper portion of the new lower section of the assembly.  This had to match the lower portion of the original mount so that the sensor switch would mount and work properly. 

This took a lot of trial and error prints to get it right and needed to be done to make the new assembly work just like the old assembly without the issues of it falling off of it's mount. 

I also had to be very careful to get the placement of the top portion of the new assembly in the exact location of the original sensor so as to not mess up how it all worked in the process.  So far I think I have it pretty well nailed down so I think I am good on that point.


Pictured above is the new sensor out assembly mounted into my 3D printer.  The red arrows indicate where the 1032 bolts are mounted that hold the sensor along with the rollers that guide the "X" axis rail on the left side of the machine.  This rail moves up and down for the "Z" axis on the printer.


In this photo you can clearly see the new sensor mounted at the back of the machine with a white arrow pointing to it.  The red arrow is pointing to the stepper motor for the "X" axis that the new sensor assembly needed to clear to be mounted properly.  The green arrow is pointing to the upper 10-32 bolt that holds the new filament sensor assembly in place on the machine. 

This new setup will be a big plus to my 3D printing as I will not have to keep fussing with the filament out sensor every ten minutes to make sure that is still in position where it needs to be.  With this new mount it is securely fastened with lock nuts and does not interfere with anything else on the machine while it is running. A big improvement in my book.  

Just one more thing that the people at Creality hopefully will take notice of and put on future machines that they produce. "Hey Creality! If you do make this change please let me know. I can  always use another 15 minutes of fame."  At least it will make my day anyway.


Friday, September 7, 2018

Fusion Drive Spaceship Carrying Case Is Completed.....Pt. 4

I am happy to report that this project has finally been completed.  I had to look at older posts to see exactly when I started this project.  To say that it has taken some time is definitely an understatement.  The first posting about the project was on May 2nd of this year.  Four months of waiting and delays have been the order of the day so I am more than happy to finally sign off on it and call it done.  So without further delay here is the end result of my efforts.


I am very pleased with how the case turned out. With all of the delays in getting this done it turned out much better than I had hoped.  The case is 15 inches wide by 15 inches tall by 30 inches long. A very big case to be sure. The painting of the case went like clockwork so that portion of the build did not slow it's completion down during the build. A plus to be sure.


In these two photos you can see that I have lined the case with gray felt.  I used a brush on contact cement and managed to get everything laid down smoothly.  It took roughly four hours to get the felt glued into place for this section of the carrying case.  I had already had all of the holes for the name plate and handles for the case already set up so it was an easy task to add these parts after the case had been lined.


Next came the base for the carrying case.  This also had been set up with all of the mounting holes for the case so it was just a matter of mounting the wooden guide plates into the case first and then lay down the gray felt once again to give it a nice finished look.  The felt for the base took 2 1/2 hours to mount to get it right as well.  The blue pieces that are also lined with felt are the mounting cradles for the spaceship model.  Lining these cradles helps protect the paint on the spaceship model. The cradles I fiberglassed  and painted earlier in the project so they were ready to assemble at this point as well. 

The black strip you see in the photos is actually a Velcro strap that is used to hold the model securely in the case when it is being transported.  All in all I am very pleased with how easily all of this came together in the project. 


I had to shoot this photo of the carrying case on my kitchen floor to get it all into the picture.  Again you can see the Velcro strap that is in the base of the case and the three cradles for the spaceship model.


Here the spaceship model is nestled nicely in the base of the case.  When I created the cradles for the carrying case I was able to make an exact copy of the profile of the ship and have it in the cradles so it is a perfect fit. A nice clean mounting resulted from this. Now you can see the Velcro strap holding down the spaceship stand in the case. 


In this final photo you can see two small cylinders that are mounted between the rear spaceship cradles in the base of the case.  These cylinders are used to keep the base of the spaceship model from sliding rearward in the case while it is being transported.  So a lot of planning has gone into this case so that the spaceship model will be protected in the coming years. 

While building the carrying case it has been a very interesting and rewarding project. If had no delays in the project it would have never taken four month to complete it. I would think it could have been done in a few weeks not months.  But no matter I am more than happy to sign off on this project and move on to the next in the workshop. Have a good day in your workshop as well!

Friday, August 31, 2018

Fusion Drive Spaceship Carrying Case Nearing Completion Pt. 3


A few months ago I completed this 3D printed model of a spaceship that I call "Titan".  I am very pleased on how the model turned out.  With this model I also planned on building a carrying case for it as it would be a real disaster if it had been damaged in any way shape or form while I move it from my home to a maker fair.  So I am happy to report that my efforts to complete the carrying case are finally nearing an end.  I thought it best to do a bit of a review of how the carrying case has taken shape so that those of you that have just seen this post can get caught up on my latest project.


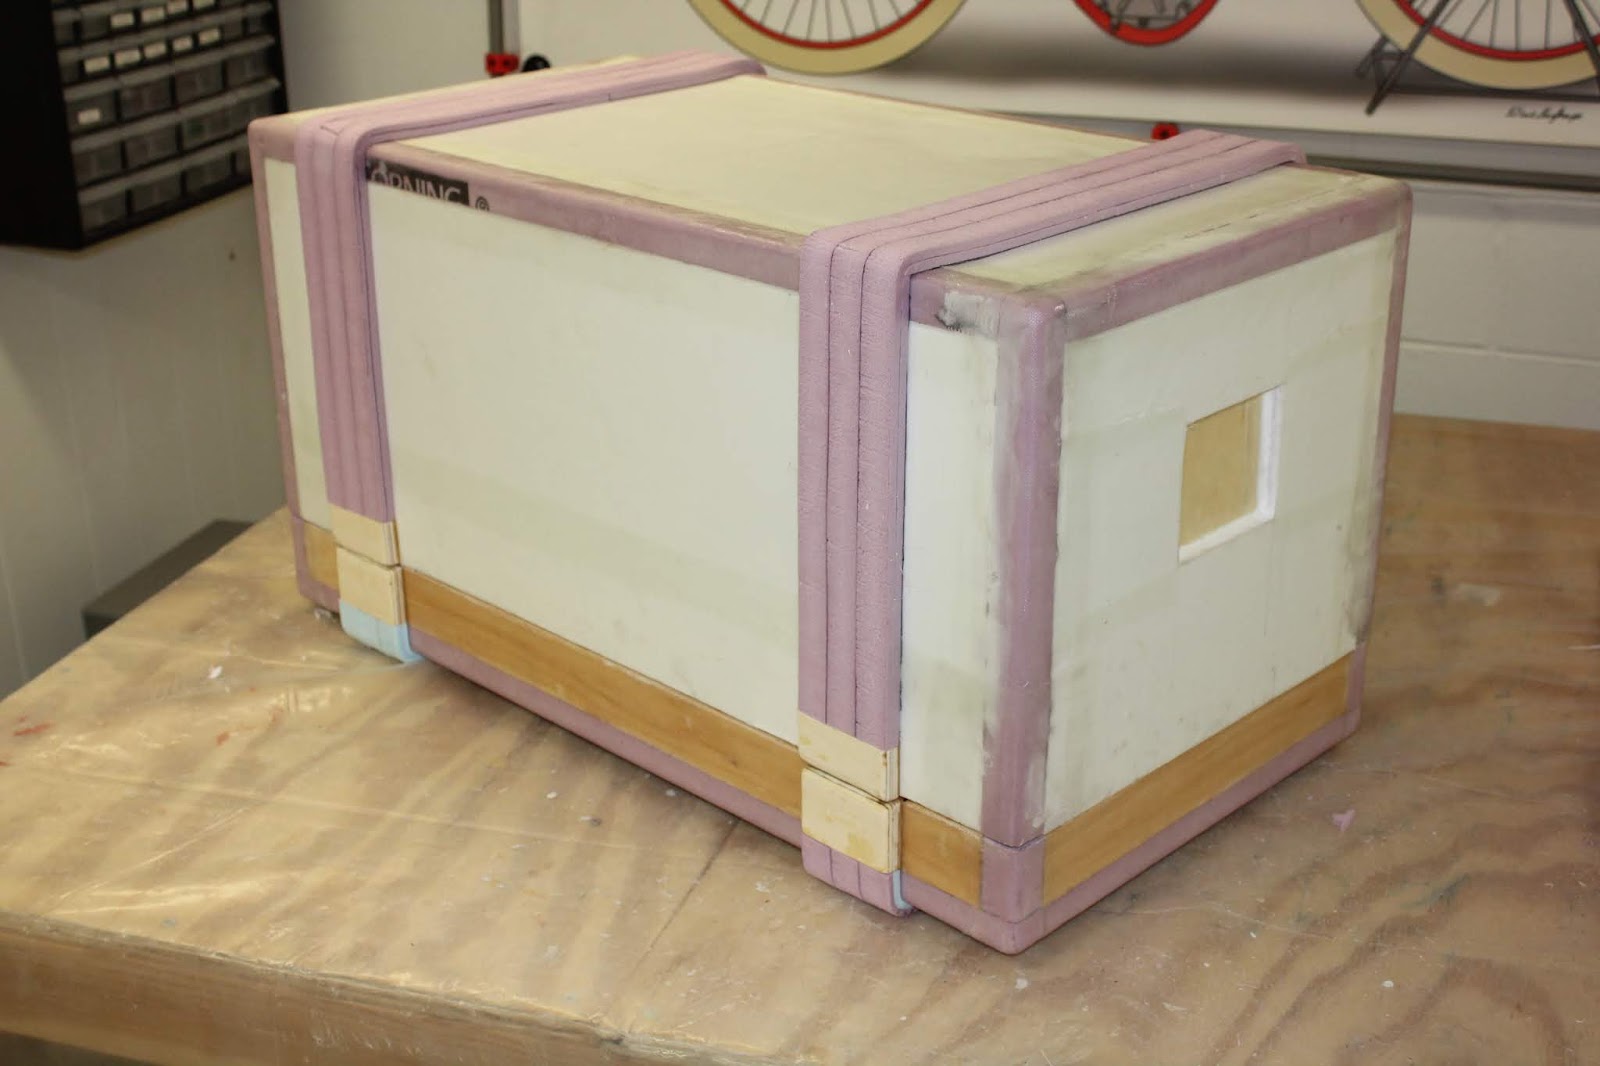
The carrying case started with a large piece of foam core and an edging of Styrofoam.  This is used for the base of the carrying case.


Next a short wall of wood was glued into place around the perimeter of the base. 


The upper cover and base construction are completed in this photo. 


All of the corners are one inch foam that gave the carrying case a solid base to work on when I started fiberglassing.


Here the carrying case top cover had been sanded into shape and fiberglassed on the exterior.  The case at this point is  roughly 15 by 15 by 30 inches long. 


The bottom of the base has mounting points for the cradles that will hold the spaceship model securely in place while the case is being moved from place to place. 


Here the interior of the top cover has been fiberglassed and the mountings for the carrying handles have been installed.


Next the outer surfaces of the carrying case were wrapped in Styrofoam strips to match up to the wooden latching mounts that are needed to secure the top cover to the base. 


After the base had been fiberglassed and smoothed out it was time for the first coats of primer so that it could be painting. Sanding and priming over and over to get the surfaces smooth enough to paint were the order of the day.


Once I was happy with the priming on the top cover  I taped off the areas that I did not want to paint white and then sprayed the handle areas and outer bands that would run around the outer surface of the case. 


When the white paint had dried I removed all of the tape and paper from the top of the case to get it ready for the next step in my painting. Already the case is starting to look a lot better than just being in primer.


I taped off the white areas now so that a nice coat or two of red paint could be applied to the case. 


I was surprised to find that the case at this point had turned out better than I had hoped.  Nice and glossy when dry. Always a good sign when working on any project.


An excellent effort if I do say so myself.  I have all of the mounting hardware and holes already set up for the carrying case so it will be an easy task to complete the carrying case when I start the final assembly.  The painting on the carrying case top cover is completed and I will add a small black pin stripe that will be added to put a nice finishing touch to the paint edges where the white and red meet.  


The base for the carrying case will be completed over the weekend and then final assembly can start. The interior of the case will be lined with gray felt and then the mounting of the spaceship cradles, carrying handles, and cover latches will be added.  Lastly I plan on small felt pads to be added to the base of the carrying case to protect the paint on the bottom surfaces when it is in use.   I suspect that the case will show some where over time but that is the purpose of the case in the first place. So I was not overly concerned that the case be in absolutely pristine condition when I completed this project.  Still I think at this point it is far better looking than I had originally planned.  I'll post the more pictures of the carrying case and the spaceship model together once I am happy with the project and I put the final touches to the carrying case. 


Friday, August 24, 2018

Blender 3D Motorcycle Concept and Animation Video

Around a month ago I completed a Blender 3D model of a three wheeled enclosed motorcycle that I had been working on.  One thing that I did not have time to post about is the evolution of the design along with the short animation that I had created for the single seat version of the design.  I had completed the animation but had been away on vacation so I thought I should get this out as soon as I could once I had returned. Thus the reason for this post.  Below is the completed four and a half minute long video that includes the animation.  If you have any suggestions of comments about the design please let me know. I would be happy to hear from you.

I may work on the design more some time in the future to refine it for at least a radio controlled model.  The real thing would be great but a ton of work would need to be done to design and build it properly, safely, and economically.  All issues that would have to be considered for any experimental vehicle like this to be sure.  In the meantime enjoy the video. 


For a larger view of the video select the YouTube icon.


Wednesday, August 22, 2018

I'm Still Here...... Still Designing And Building

I am sure a lot of you wonder what has happened to me over the past three weeks or better.  Rest assured I am still here and still designing, building, and finally getting back to posting new projects for my blog.  The reason for my absence these past few weeks has been because I have just completed a trip that I promised myself 43 years ago.  I returned to Hawaii after all that time and took a major vacation with my sister who had never been there.  While I was in the Navy 43 years ago I was discharged from the service after serving for four years. My ship was home ported in Pearl Harbor and I always swore that I would return to one of the most beautiful places in the world.  This year I finally made that happen.  My sister and I spent five days in Oahu  and another five days in Maui. What a trip! So just to brighten your spirits as much as mine has been these past weeks here are just a couple of the photos I took from the trip.


So back to the matter at hand.  I have several projects planned that I managed to get halfway worked out while I was resting on the beach that will be coming up soon.  The first project that is currently on my workbench is a carrying case for the spaceship that I completed a couple of months ago.  I still have a little tweaking to do on the case before I can finish painting it and then final assembly will wrap things up in short order.  Hopefully in the next week or so.  

I also have a new British flag display that has been rolling around in my head that I thought I would put together to hang in my garage being as I am a big British car nut and drive a Mini Cooper to prove it.  Also I have plans for a small light display for a glass world globe.  The globe is not very large. Maybe the size of a baseball but having it sit on a base that is lit up would show it off nicely on a desktop. 

Along with these projects I have thought also about redoing my 3D printed iPad video teleprompter.  The one I originally build a number of years ago is to small to be used with my iPad Pro so again this would be a nice project to revisit. 

So as I said earlier I have not disappeared and the blog is still alive and well. All I have to do is get back to work in the shop and start posting on a regular basis again. After all of the driving, air miles, and walking I have done over the past few weeks it is great to be back home once again to my sleepy little town and a nice workshop.  I'll be posting about new projects very soon so be assured that everything is back to normal as usual.  Enjoy the photos.