Tuesday, May 29, 2018

A Miniature Foldable Bowling Alley For Kids!

Time for me to get all of you caught up once again with a couple of the projects that I have been playing around with here at the workshop.  Work is still progressing on the carrying case for the Titan spaceship project but has stalled a little bit over the past couple of days simply because of the 90 degree temperatures that have landed on the Midwest.  But tomorrow promises to be cooler so I should be able to get back to work on that project.  Also in the works and the main reason for my posting today is a project that will be a terrific present for my grandson later on this year.  A miniature bowling alley!


Here is my design for the bowling alley and it looks very similar to other toy bowling alleys that you can find online. But I made the following improvements to the design.


With my new design the bowling alley now is foldable so it makes the perfect storage container to hold the ball and pins when the game is stored away and not being played.  This and the fact that the alley when it is being played is four feet long can now be shrunk down to only 2' x 1' x 1.7" in size which makes it easier to store and less likely to loose any of the pins or the ball.  Locks will be added to the bowling alley and of course a handle so it will be easy to carry from place to place.  The special double hinge for the bowling alley is made up of 3D printed parts that are mounted together with screws and bolts to make up the folding mechanism work for the project.


I came across a picture of a nice little bowling alley for kids a few years ago and stashed away for future use.  I had this idea to improve on the original design so now is the time to start work on it.  I put together this little video to explain it all further and give you a better idea of what I have in mind. Once I start putting things together I will put out the second post about this little project as I know it will be a lot of fun to play with and be a great project in the process too.  So enjoy the video. 


For a full screen view of the video select the YouTube icon and view it there.


Friday, May 18, 2018

Fusion Drive Spaceship Pt 6.............It's Completed!

After having worked over 200 hours on my Fusion Drive Spaceship model I finally completed it early this afternoon!  Having had to redesign the model to make it stronger and more able to be repaired if it ever needs to be I am proud to present it to you now. 

(Click on pictures for a larger view)


With all the work that went into the model I am more than happy with my efforts and how it all turned out.  The model as you see  here is roughly 26" long, 14" tall on the stand and 12" wide.  All of the components that make up the model were 3D printed excluding the large light bulb and the domes on the front of the dual engines on both sides of the fusion drive (large light bulb).  I am also happy with the photo above as I took these shots on my kitchen floor.  Most people who know me would think that this is another Blender 3D model.  I am happy to say it is the real thing.


Once all of the parts were redesigned for the new model you see here the parts were sanded, primed and sanded and primed...etc....etc.   Once I was happy with the finish of the parts I was able to lay down the nice glossy white paint that you see in the photos above.   Assembly of the model took me around 1 1/2 hours as there are over 100 parts in the model.  Everything fit as I had planned so I am more than happy that I did not have to redesign the model again to make further changes to it. 


As you can see in the photo above I am a very happy camper!  The photo also gives you a very good idea as to how large this model is.  I am also happy that I have already started work on the carrying case for this model as I want to protect it now more than ever from coming to any harm that could happen to it when I transport it from or to the local makerspace or a maker fair.  


With the size of the model the name Titan fits for sure.  I know it will be a big hit with my friends from my makerspace and I hope you also approve.  The spaceship by the way is removeable from the stand and it to is very solid in construction so I will not have to worry about the model when it is on display.  

Another very good day here at the Tinker's Workshop.  I hope you latest project is going as well as this one has for me.  Have a good day in your shop!

Wednesday, May 9, 2018

The Fusion Drive Spaceship Carrying Case Project Part 2

Lots of building and rebuilding has been going on in the shop this week.  With the redesign of the Fusion Spaceship model lots of parts needed to be redesigned and then 3D printed and now primed and painted.  Also with this work I have made progress on the carrying case for this large model.


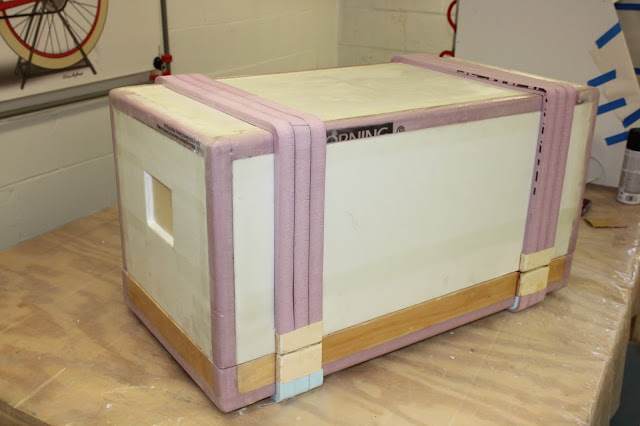
This large carrying case now has all of the foam assembled to it's outer skin and the base has been nearly covered with the remaining fiberglass cloth to it's exterior.  The upper portion of the case still will need the last bit of fiber glassing done to the pink outer straps that now wrap it's exterior as well.


Mounted in the base of the carrying case are the three hard mounts that will locate the vertical supports that will hold the spaceship model in place once it has been completed and is in need of transport to some destination.  The hard mounts are nothing more the 1/4" thick plywood that have been fiber glassed into the base with the mounting holes already in the wood for an easy installation.


Bolts will be inserted from the bottom of the case up into the vertical supports to hold everything in place when the case is in it's final construction.  As I've said in an earlier post I have redesigned these vertical supports to make them a bit smaller in size but they will be the same height as what is shown in the image above.  I still may make up a hold down strap for the stand itself to secure the spaceship model more securely once it is inside of the carrying case. 


The interior of the base as will as the lid for the carrying case have been completely fiber glassed other than the edges where the two parts meet up together when assembled.  The edges will still need to be filled with a fiber glass resin/micro balloon putty mixture to seal them properly.  Not a hard task to complete but a little time consuming. It will make a nice clean edge on the two parts and so it will serve the purpose rather well.  Once I have both of the parts completely fiber glassed and edges done then the real work will begin to get everything smoothed out for paint.  

Luckily this will be simpler than trying to smooth out small intricate parts.  As the carrying case is rather large at roughly 15" x 15" x 30" in size it will be an easy task to take the parts outside and sand them smooth with an orbital sander when the time comes.  Then finally paint on the outside and I then plan on lining the inside with gray felt.  This will finish off the inside rather nicely I should think.  

For now this portion of the project has been put on hold as I am waiting for more fiberglass cloth and resin which should be here some time next week.  In the meantime I have been pushing hard to complete the spaceship model so that part of the project will be done when I complete the build on this big case.  I'll keep you up to date on the progress.  Have a good day in your shop!

Thursday, May 3, 2018

Accurate Cura 3D Print Time Estimate Solution!

As most anyone who has been following my blog over the years already knows I am a big fan and user of 3D printing.  I am constantly working on some project that requires my design skills and knowledge of this subject so I thought I would pass on something that many users will find helpful if not at least interesting.

I recently upgraded my 3D printer setup and along with this have had to also change my 3D printing software to make the things I create. I am currently using the Ultimaker Cura 3D print slicing software.  My opinion of this software has been improving over the past few weeks as I learn new things about using it with my Creality CR-10 S4 printer.  

With this new setup I have come across something that from the start kind of confused and annoyed me while using the software.  


Here a screen shot of a part that I am at this very moment 3D printing using Cura.  In the lower right hand corner of this image is an estimate of how long it will take to 3D print the part that you see here. Cura tells me that it should take 5 hours 18 minutes to make it.  In actuality the prints always take longer.  I did some research online and found out that most 3D printers take the Gcode and loads up several lines at a time and then it gets sifted through the processor and finally the print is made.  This process adds extra time to making the part so I was never sure when my part would actually finish. 

With a little more testing on my part I have come up with the answer that I was looking for from the start. I made several different 3D printed parts and kept a log of the Cura time estimate and the actual time it took to make the parts.  I then took the Cura time and converted it to minutes so 5 hours 18 minutes would convert to 318 minutes.  Then I took the actual build time of the part which was 5 hours 54 minutes and converted it to just minutes......354 minutes.  With these number I then divided 354 minutes by the 318 minute estimate.  This gave me a number 1.114. This number I use now to get the correct time estimate for my 3D printed parts.  I take the Cura time estimate for any 3D printed part and times it by 1.114 and it gives me the correct time it will take for my 3D printer to make the part.  I have checked this several times now and it works or it's at least a lot closer than what Cura has been telling me.  I will keep a log of 3D prints and times then get an average so I will have a ball park figure to work with in the future. 

So if you would like to know the exact time or something at least a lot closer than the Cura time estimate do the math for your 3D printer to come up with your conversion number. Again mine being 1.114 may not be the same as what you will come up with but at least I know it works for me. It helps me know now what amount of time I will actually have to wait to get my part made.  Hope this will help you as much as it now helps me.  


Wednesday, May 2, 2018

The Fusion Drive Spaceship Carrying Case Project

With the redesign of the Fusion Drive Spaceship still in the works, I have been also steadily working on a carrying case for the spaceship model. The best estimate that I can give anyone at this point is that the spaceship will take right around 200 hours work to complete.  With all of that work put into the model I thought it best to protect it by building a carrying case to keep it from getting damaged in transport to and from a local makerspace or an up coming maker fair in June.  So with that in mind I wanted to get this post out to keep you all up to date on what I have been up to in the workshop.


This is what I came up with for the final look for the carrying case.  I remembered years ago when my sisters or mother had a sewing machine that they had a carrying case to transport it.  It had a base where the machine set with an upper lid that covered and locked on to it.  I thought this would work perfectly well for the spaceship model carrying case.


Here is what the spaceship model would look like once it has been placed inside the carrying case. The blue colored columns mounted into the base are designed to support the front section of the model as well as the engine pods as shown in the photo above.  These columns will help stabilize the model while it is being transported and keep it from getting damaged.


I started construction of the carrying case by gluing together a large sheet of 1/4" foam core and 1"x1" Styrofoam edges.  These edges I cut on my band saw from standard Styrofoam sheeting used in home construction.  To attach the foam edging to the foam core I used a hot glue gun so it was a fast and simple part of this project to work on.


 Once the base edging foam was in place I was able to glue on the wooden edging and corner foam to form the base for the carrying case.


 The wooden side sections of the base were glued in place using wood glue.  I was able to get a nice fit in the corners so with a little masking tape I was able to hold all of the pieces firmly in place until the glue had dried.


In this photo you can see the construction of the lid for the carrying case.  It was put together in the same manner as the base but with smaller wooden inserts for the latches that will be added later on in the build. 


All of the foam edges for the lid were hot glued in place. I then rounded all the outside edges of the lid using my router table and some hand sanding. After fiberglassing the outside I then was abe to make the inside foam concave by using a hot wire tool for that purpose.  This made the fiberglassing of the inside of the lid much easier as the square edges would have created a lot more work and not have give me a nice smooth design on the inside.


The small inserts on the ends of the lid will be where the metal handles will be installed to carry the case when it is in use.  This insert was made using 1/4" wood and a small spacer to get the depth that I wanted for the handles so they did not stick out on the ends of the case.  


Here the base and lid for the case have been completely assembled.  I still will need to round the outside corners on the base and do the fiberglassing but the rest of the work is in order at this moment. 


When the initial build of the case has been completed I will add the four inch wide stiffeners to the outer surface of the case as shown in the photo above.  At this point all of the fiberglass will have been laid down. It then will have to be sanded smooth, primed and painted.  Then I can add the latching hardware, handles and the support parts for the spaceship model itself that will be in the base.  So as you can see I have my work cut out for myself in the coming weeks with all that needs to be done on this rather large case.  It will be 15.5" wide 15.5" tall 30.5" long.  I also plan on covering the inside of the case with felt to put the finishing touches on it. 

This carrying case will be just as impressive as the model that it will carry and should protect it very well in the coming years.  It will also make a nice display stand for the model when I do show it at the local maker fairs coming this year.  I will post more once I get closer to putting the final touches to this big project.