
The last couple of days have been the best that it could be while working on the new fenders for the velomobile Ridekick power trailer project. This little trailer will supply power to the velomobile to make climbing hills easier. It has a range of 35-40 miles at 20 mph so it should do the job nicely. I wanted to get this post out to everyone to get you caught up on the progress that I've made on the project over this past week.


Here are a couple images that I created of the design I am talking about that I posted a little while ago just to remind everyone where I am heading with it. So let's get started on how I put the fenders together.


This was the first step. I cut three pieces of one inch Styrofoam which were 15 1/2 inches square. The foam in standard building construction foam that you can buy at your local builders store. I glued the foam together using Foam Fusion adhesive from the Hotwire Foam Factory. This glue looks like regular white glue you would use for wood but can still be cut using a hotwire tool and is made specifically for foam. Great stuff. I let this sit over night to dry properly.

I then marked out a 14 1/2 diameter circle on the foam and cut it out using my band saw. This worked out perfectly as you can see. The new disk gave me enough material to make both fenders for the power trailer.

Now the next step took me a bit more time to figure out. I needed to cut down the amount of material I needed to get the correct shape for the fenders. Rather than do a ton of sanding I tipped the table on the band saw 30 degrees and then ran the foam disk up against the rip fence. I had used a temporary guide so I knew how deep the cuts should be so I could retain the shape I was going for. Again my planning paid off nicely.


The next test was similar to the first except I needed to change the set up a bit on the band saw. On the first cut the disk was laying flat like you see in the photo above. To make the second cuts I needed to place the disk on the band saw so it was sitting like I was going to roll the disk on the table. This made the second cuts as I had planned a bit more difficult to do but after I was done I could stop holding my breath when I completed this step in the process.

Next I started sanding the foam into shape to make the mold for the fenders. Sanding the foam is very easy so I just took my time and worked my way around one side sanding at an angle to the edges that I had cut. As you can see the part was starting to shape up nicely now.

Here the foam disk has been completely sanded smooth into the shape that I wanted for the fenders. The marks on the foam piece are guides that helped in cutting the disk apart later on in the process.

In the fender design I needed to make a small protrusion that would mount the fenders to the lid of the trailer. This protrusion allows for correct alignment of the mounting hardware and clearance for the tire when the fenders are in place. I cut two small 1 1/2 inch thick foam blocks to be used to make the protrusions for the fenders. The only reason the foam is not blue like the disk is that I had some two inch pink foam laying around in the shop that was perfect for the job.


Here you can see the foam disk has now been cut in half and this will be the start of one of the fenders. I have marked out where the pink foam block should be located on the half disk so the next step was to remove the foam that was not needed to install the new foam block.

I laid the foam half disk on the table and used a hot wire rod tool and a 2 x 4 to cut out the foam that I needed to remove. This only took a couple of minutes and made a nice clean job of the task in the process.


After both half disk parts had been modified to accept the pink foam blocks it was just a matter of inserting them into the new cavities that I had created and bonding them into place using fiber glass epoxy resin and micro-balloons to putty them into place.

In the photo above you can see that the pink block has been mounted in place and a couple layers of fiberglass have been applied to the outer surface of the foam. The white half circle of card stock was used to mark out where I needed to cut the foam to create the fender shape I was going for.


After the first couple of layers of glass had been placed on the foam I realized that there was nowhere near enough glass on the parts to make the fenders strong enough or stiff enough to make them useable. So I went to work adding the additional layers that were needed. In all I started with two layers of 3 oz. glass, then four layers of 8 oz. glass and then two more layers of 3 oz. glass to finish the parts off.

After adding the additional glass and letting the parts cure over night I again marked where I needed to cut to make the fenders using my cardstock template. This was much easier to see where I needed to cut once again.

With the Styrofoam shape being flat enough to lay on the band saw table top I was able to make the first cut going all the way through the part to remove the inner section of the foam form. I took my time and was able to get a useable cut that was very close to near perfect. I will have to tweak it a bit but it should not be a difficult task as long as I take my time with it.
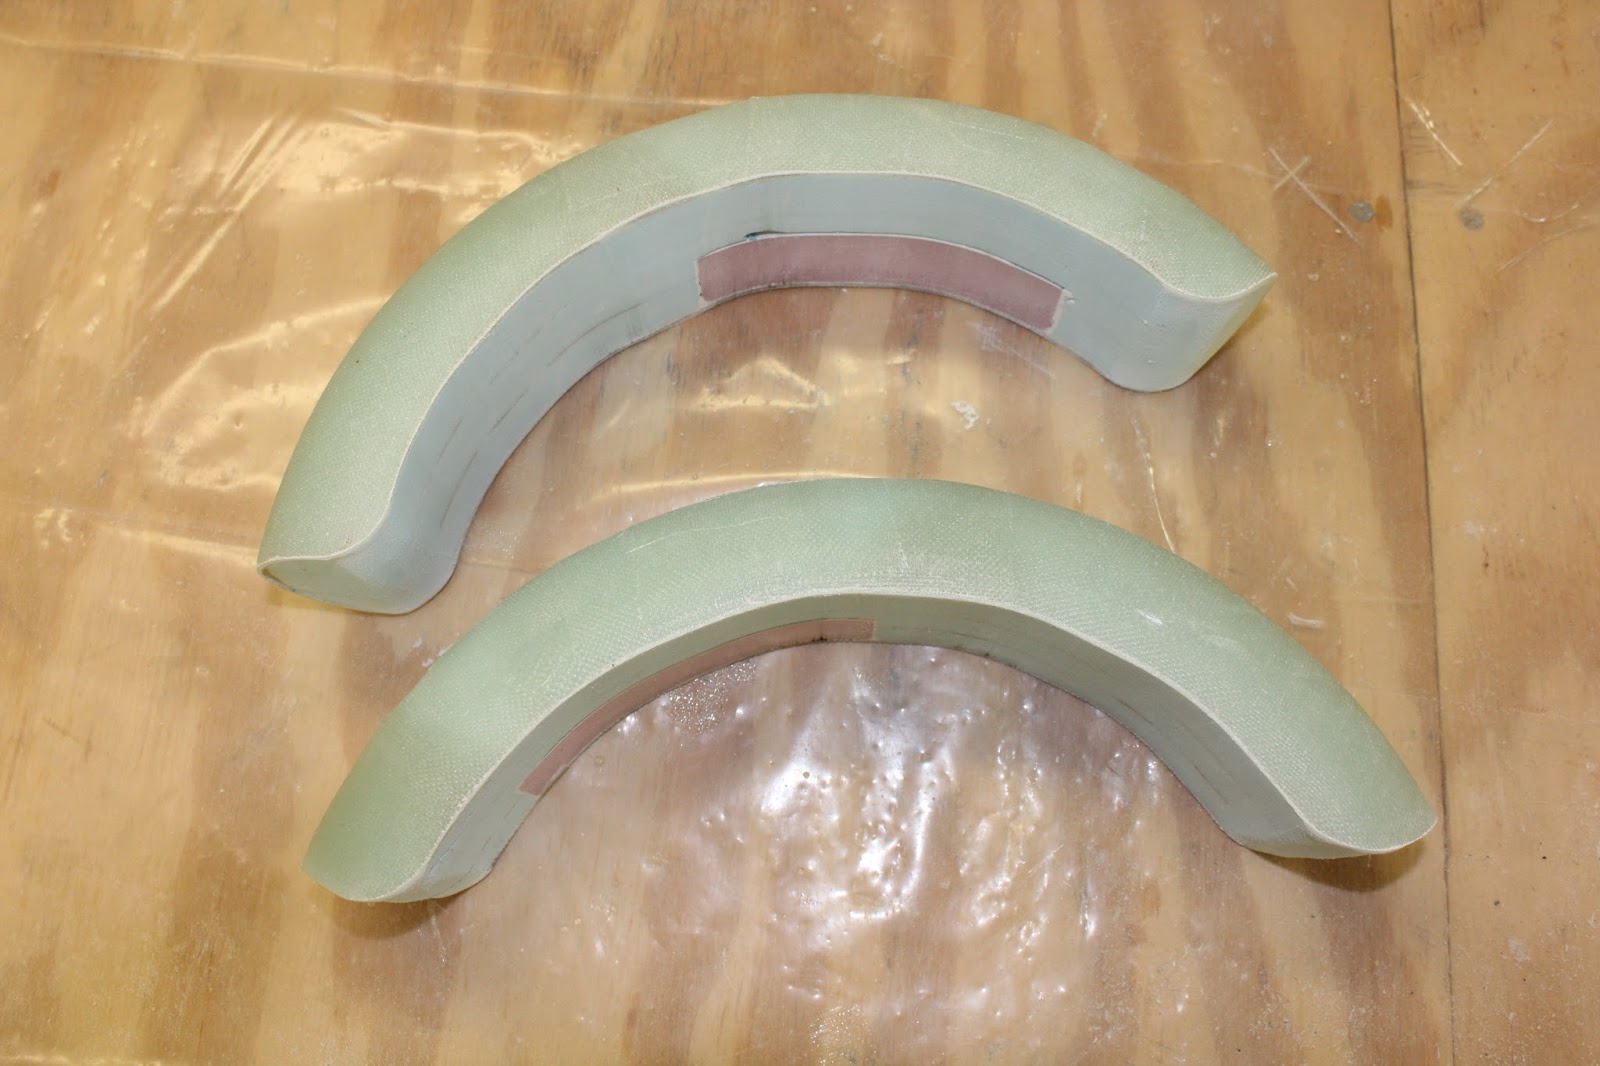
Here both fenders have been cut and the corners of the foam have been rounded off nicely to get the shape I was shooting for. They look like fenders already. Again I was very pleased with the results and progress I had made in only a couple of days.

The next step was to remove all of the foam that was on the inside of the fenders. Again I used a hotwire tool for this part of the project. This tool looks like a wire loop with a handle on it that heats up to easily melt the foam and cut out what is not needed. The entire process only took about ten minutes to get to this point. After that I took a small pocket knife and scraped away any foam left over from the first pass and then finally sanded the inner surface with sand paper to clean up what remained.


Once I had the fender completely cleaned I temporarily placed them on to the trailer just to see what they looked like. I used small blocks of Styrofoam to hold the fender on to the top of the tire and took the photos that you see here. I am very pleased with the look of the fenders and how they turned out. In the photos the fenders actually are a little high but this will be corrected one I get the mounts dialed in to get the fenders lowered just a little bit. This again will take a little time but I am in no rush at this point to hurry only to mess things up now.
I will work on the mounts in the next couple of days and then will start working on prepping the fenders as well as the body of the trailer for the new paint scheme I have in mind. All of it so far is shaping up nicely don't you think? I'll post more as this project moves closer to completion. Have a good day in your shop!
No comments:
Post a Comment