
Two weeks ago I posted about finding a couple of projects that I had completed but never blogged about. One was the custom built coolers I had made for my motorcycle cargo trailer and the other is a large BMW sign that I had built for a friend of mine who still works at the same dealership. Jeff Wilson and I became good friends over the past few years after I had purchased my first used Mini Cooper from him. He wanted a BMW logo sign to hang in his garage and so this is what my post is about today.

Here is a photo of the BMW log that I shot at the dealership when I started this project. The logo is about two inches or so in diameter but I planned on making one much larger than that to hang on the wall. Thirty inches in diameter to be exact.

I started off with a 1/4 inch piece of plywood and cut out the 30 inch diameter circle. On this piece I also drew out the circles for the placement of the parts that would make up the rest of the sign.
The outer ring and inner target pieces were cut out next again using 1/4 inch plywood.

In this photo additional pieces to this puzzle are starting to be cut for the assembly. The rectangular pieces will make up the cross pieces needed for the center of the sign. The smaller curved pieces will be added to the outer ring to thicken up the assembly.

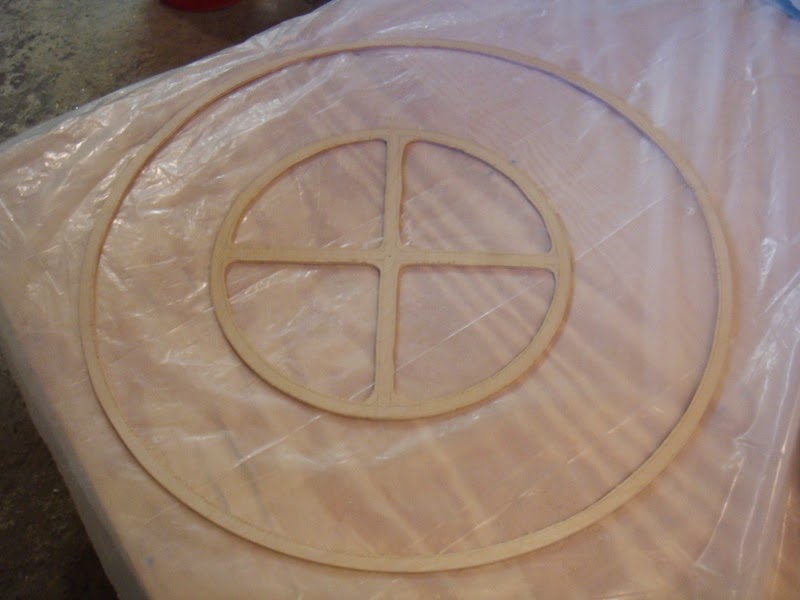
Here the additional curved pieces are glued and taped to the outer ring and let to dry.

The rectangular pieces in the earlier photo are also glued together to make a thick more solid assembly.

Here the assembly has been laid out with the various pieces after the glue had dried over night.

Curved foam pieces are added next to complete the parts needed for the center assembly.

The outer ring of the sign is marked out on to two inch thick Styrofoam so that it can be cut using a tool called a hot knife. This tool is like a steel rod with a handle attached. It plugs into electrical power and heats up to cut the foam precisely and cleanly.

After the foam ring had been cut out it was placed on to the assembly to check the fit for the sign.

Four additional foam pie shaped pieces were cut and placed into the inner assembly. On the table you can also see some curved pieces that were also needed for the build.

Lots of clamps were needed at this point to hold all the wooden pieces of the inner section together while the glue was drying.

This photo is interesting as it was the jig that I made up to cut the foam into a dome shape on the face of the sign. On both sides of the sign you can see curved pieces of wood. These were guides that help make a curved cut from the top to the bottom of the sign using a hot wire cutting tool.

This was how the sign looked after just one cut.

I rotated the sign several more times to make additional hot wire cuts and end up with a fairly decent dome shape for the sign.

Here all of the pieces for the BMW sign have been cut and sanded into shape. The dome shape at this point turned out perfectly. Sanding on the foam is an easy task and with little effort the results speak for themselves.

The letters for the sign were just 1/4 inch plywood that was sanded smooth and painted silver.

Most of the pieces for the sign at this point had been fiber glassed, sanded and the first coat of primer were sprayed on them.

After several priming and sanding sessions had been completed I was ready to put some color on to the center section parts.

The fit and finish of these parts turned out great for these parts so I could keep moving along with the project.

Silver paint for the center target piece was used. With the fiber glassing, sanding and painting work done on this part, it looks like it is solid aluminum. Another pretty piece of the puzzle.


The center section of the sign is completed. Now on to the rest of the parts to finish this project.


Here the outer ring for the BMW sign is primed, sanded and painted. Actually primed and sanded over and over again before final paint. My efforts were worth the final result as you can see in the nice glossy black paint.

Here finally all of the parts for the sign are ready for final assembly.


The real task in making this sign was not the making of the individual parts but was assembling all of the parts and not messing up the paint in the process. The word for this part of the project was "CAREFULLY". As in carefully place the parts and keep your fingers crossed that you don't mess it up. I breathed a sign of relief when this project was competed and I could step back once again and admire my latest creation.
I spoke with my friend Jeff just last week and the sign now will be moved from his garage to his office at the BMW dealership. So it will be a nice display for customers that stop by his place of work. Thanks Jeff!
Make a disc covers for your velomobile like this :)
ReplyDelete