This week on the blog I put the finishing touches to the LED dune buggy signal lights project. This is how it all turned out.
Here once again is how one of the housings for the new LED tail lights looked after having been sanded and primed for the first time. As you can see it is "OK" at best as it is nowhere near ready for paint and it doesn't fit the profile of the body as properly as it should.
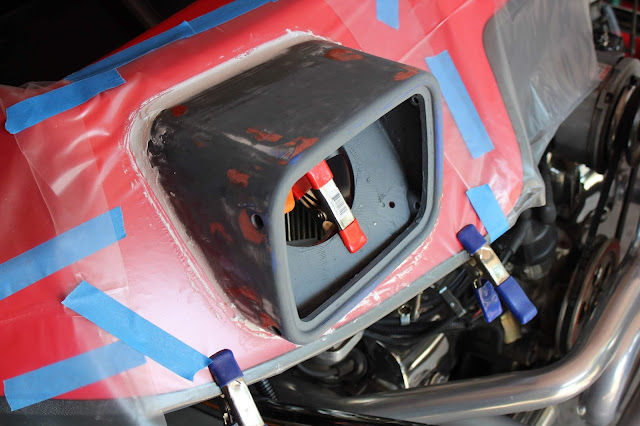
To solve the fit up issue I covered the body with plastic and then remounted the LED housing to it's original position using small spring clamps. I then puttied the mating surfaces of the housing and the body where they met up. The putty is a mixture of fiber glass resin and micro-balloons. Micro-balloons are micro-spheric hollow glass balls that make up a lightweight filler when mixed with the resin. I let the putty mixture cure overnight and then removed it from the dune buggy.
Here you can see the difference from the first fit-up of the housing to the body of the dune buggy. A perfect fit now that it has been sanded smooth to match the profile of the housing.
The back of the housing for the LED tail lights had a large 4.5" diameter hole in the design. This was exactly the size of hole that was cut into the body of the dune buggy for the old tail lights. With the housing having the same size opening it made it simpler to align the lights to the body of the dune buggy and have both lights positioned correctly when mounted. It also made mounting the new housings to the body easier as well by allowing me to mark and drill the new mounting holes for the housing.
The one drawback to having such a large hole was what to do with such a large opening after the lights had been installed. A perfect doorway for any little critter to call home so another part needed to be designed and installed.
The yellow part in the image above was the answer. This little cover was mounted to the inside of the housing to seal the large opening yet allow the wiring to be inserted into the housing for the LED lights with a much smaller hole.
These two images best display how the new housing cover was mounted into the assembly. This was easily done with the same putty mixture that I used to get the fit up corrected for the housing and body. I bonded the cover to the inside of the housing and then let the epoxy resin putty again cure overnight and the little cover was then secured permanently in place.
After the housing had been properly sanded and painted a nice glossy black, I was able to finally get at the last step of the project and mount and wire up the new tail lights.
The new LED lights are a vast improvement from the old tail lights that were in the car. This also really improved the look of the tail end with the 1964 Mustang tail lights. I really like the chrome trim and the red accent that I used that is around the tail lights.
With the housings for the tail lights being painted glossy black it matches nicely with the rest of the black that is already in the car. It took me some time to get the wiring all nicely tucked away under the body of the car so that was the major part of the work to the installation of the lights.
I have to give a big shout out and thanks to my brother Carl who painted the LED tail light housings for me. He did a wonderful job in one day's time where it would have taken me a week to get the results that he is very skilled at. Thanks brother!
Now I can take the rest of summer and get some miles on the little dune buggy and show it off at some of the local car shows in the surrounding area.


No comments:
Post a Comment