Tuesday, June 25, 2019

Creality CR-10 S4 Filament Sensor Assembly Redesign Of A Redesign

As with most redesigns of either a part or assembly you never know if the redesign worked properly until you have used it for some time.  This has been the case of my filament sensor assembly for my Creality CR-10 S4 3D printer.  One thing that always bugged me from the start was this sensor that constantly got vibrated off of it's mounting location due to it's poor design.  Here is how it all started back in September of 2018 while running my printer.
 This is what the original sensor assembly looked like that came on my  Creality CR-10-S4 3D printer.  The small box on the left of the assembly houses a small circuit board with a contact switch that activates once the filament runs out after passing through the sensor and then triggering the switch to halt the machine so you can reload a new spool of filament to continue your project.

  The only problem with this setup was the attachment of this assembly to the printer itself.  It simply was slid on to a flat plate near the stepper motor that pulls the printer filament into the machine to make your part.  This sensor over time would vibrate off of the mounting plated and be left dangling while the part continued printing. Not something I thought was a good idea.


So with the first revision of the sensor assembly I eliminated the small part that slid on to the mounting plate and made a more solid mount that bolted directly to the machine through the mounting holes that held the guide wheels for the left side of the printer "Z" axis.  In the images above you can see the assembled sensor assembly as well as the exploded view of the same assembly.

Just below the blue top cover plate is the sensor circuit board that make this assembly actually work.  Just a simple on/off switch that comes on when the filament runs out.  This assembly mounted perfectly to my 3D printer but had a flaw in the design and I put off correctly it until yesterday.  

The problem with this setup was that it was difficult to install new filament through this assembly and have it also be fed easily into the stepper motor drive assembly at the same time.  It seemed at times to have no issues and other times I would fuss with it for 10 minutes or more to get new filament loaded into the printer.  An issue that had become more and more frustrating while trying to 3D print parts.

What was going on was that the original mount made loading new filament into the machine simple because the sensor could be removed from the printer first. Then new filament was passed through it's opening and then on to the stepper motor drive assembly opening.  Once this was accomplished all that was needed to be done was remount the sensor assembly and printing could continue on before the reload was needed.  But this just put everything back the way it was where the filament sensor would eventually vibrate off of the printer once again over time. 


To finally eliminate the bad part of the first redesign I had to make the modification just a bit more user friendly.  In the image above you can see the first redesign on the left and the second redesign on the right.  On the left redesign the yellow column is mounted to the 3D printer along with the sensor switch, blue cover plate, three mounting screws and the larger bolts and nuts to hold the assembly to the 3D printer.  Again this looked good but made it difficult to reload new filament as it could not be removed from the machine while trying to put in new filament.

On the right you can see the new improved filament sensor assembly.  In this assembly you can see the redesigned yellow sensor mount, four neodymium magnets, a red sensor mounting housing, the sensor circuit board, the blue circuit board cover plate, three cover plate screws, and the large mounting bolts, nuts and spacers for the complete assembly. 

This new assembly now has a solid mount as before and the capability to remove the sensor from the assembly quickly and easily because of the small magnets between the upper and lower sections of the assembly. 


In the photo above you can see the new assembly mounted on to the 3D printer.  The white arrow is pointing to the filament out sensor, the orange arrow to the stepper motor that moves the filament into the printer, and the green arrow shows the upper mounting bolt that holds the top portion of the lower assembly firmly in place.   

The new magnetic mounts for the filament sensor are strong enough to hold the sensor in position while 3D printing but not so strong that it makes it difficult to pull the switch off of it's mount while reloading the machine with a new spool of filament.  

I think this will be the perfect solution to the problem that I was having with my first redesign.  As I said from the start sometimes you have to use the new design for a while to make sure it is what is needed to fix the original problem with a design. In my case I ended up finding an additional problem simply because I could nto remove the sensor while loading new filament into the printer.

 I will use the new setup for awhile to make sure I have everything ironed out the way I want. If not then I will try again but for right now this looks to be the best solution to the original issue as well as the found issue I was having with the filament sensor.  At least I hope so anyway.  Time will tell.  

Tuesday, June 18, 2019

New LED Dune Buggy Signal Lights Project Is Completed!


This week on the blog I put the finishing touches to the LED dune buggy signal lights project.  This is how it all turned out.


Here once again is how one of the housings for the new LED tail lights looked after having been sanded and primed for the first time.  As you can see it is "OK" at best as it is nowhere near ready for paint and it doesn't fit the profile of the body as properly as it should. 


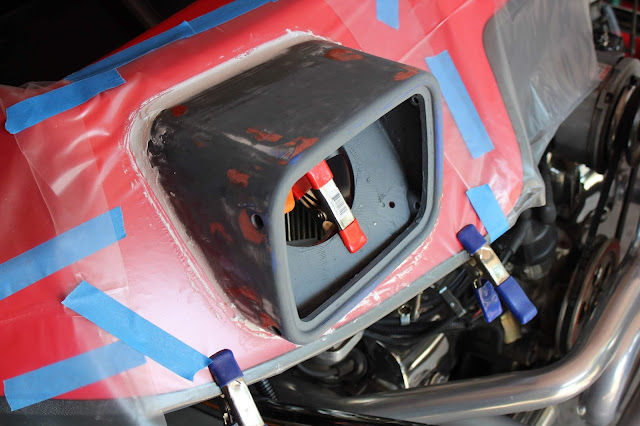
To solve the fit up issue I covered the body with plastic and then remounted the LED housing to it's original position using small spring clamps.  I then puttied the mating surfaces of the housing and the body where they met up.  The putty is a mixture of fiber glass resin and micro-balloons. Micro-balloons are micro-spheric  hollow glass balls that make up a lightweight filler when mixed with the resin. I let the putty mixture cure overnight and then removed it from the dune buggy. 


Here you can see the difference from the first fit-up of the housing to the body of the dune buggy.  A perfect fit now that it has been sanded smooth to match the profile of the housing.  


The back of the housing for the LED tail lights had a large 4.5" diameter hole in the design.  This was exactly the size of hole that was cut into the body of the dune buggy for the old tail lights.  With the housing having the same  size opening it made it simpler to align the lights to the body of the dune buggy and have both lights positioned correctly when mounted.  It also made mounting the  new housings to the body easier as well by allowing me to mark and drill the new mounting holes for the housing.  

The one drawback to having such a large hole was what to do with such a large opening after the lights had been installed.  A perfect doorway for any little critter to call home so another part needed to be designed and installed. 

The yellow part in the image above was the answer.  This little cover was mounted to the inside of the housing to seal the large opening yet allow the wiring to be inserted into the housing for the LED lights with a much smaller hole. 


These two images best display how the new housing cover was mounted into the assembly.  This was easily done with the same putty mixture that I used to get the fit up corrected for the housing and body.   I bonded the cover to the inside of the housing and then let the epoxy resin putty again cure overnight and the little cover was then secured permanently in place.


After the housing had been properly sanded and painted a nice glossy black, I was able to finally get at the last step of the project and mount and wire up the new tail lights.  


The new LED lights are a vast improvement from the old tail lights that were in the car.  This also really improved the look of the tail end with the 1964 Mustang tail lights.  I really like the chrome trim and the red accent that I used that is around the tail lights.  


With the housings for the tail lights being painted glossy black it matches nicely with the rest of the black that is already in the car.  It took me some time to get the wiring all nicely tucked away under the body of the car so that was the major part of the work to the installation of the lights.  


I have to give a big shout out and thanks to my brother Carl who painted the LED tail light housings for me.  He did a wonderful job in one day's time where it would have taken me a week to get the results that he is very skilled at.  Thanks brother!

Now I can take the rest of summer and get some miles on the little dune buggy and show it off at some of the local car shows in the surrounding area.  

Tuesday, June 11, 2019

New LED Dune Buggy Signal Lights Project Part 2


Things are going well this week with the LED dune buggy signal light project.  I have managed to get through all of the 3D printing that needed to be done and have started smoothing out the parts to get them ready for paint.  So with all of this progress I thought I should show you how it all looks at this point.


This part which is one of the LED light housings for this project took 35 hours to 3D print.  I am very pleased with how it turned out.  The vertical wall that you see in the part above was a support wall only used during the printing of the part.  It was removed very easily after the print was completed. 

With the two housings that I need for the project, I also needed to 3D print the mounting plates for the lights as well.  This added an additional 16 hours of 3D printing.  After having completed this portion of the project I am also more and more impressed with my Creality CR-10 S4 3D printer as well.  A real workhorse to make such nice parts for this project. 


Here are the two LED light mounting plates for the project.  The one on the right is still in primer and glazing putty and the one on the left has had all of the sanding completed along with a couple of nice coats of glossy red paint.  They will look great when both are completed and installed in the final assembly.


After the light housings had been 3D printed I decided that I should strengthen them by coating them inside and out with several layers of fiberglass.  The housings were only printed with a 20% infill (honeycomb webbing on the inside walls of the part) which kept the print time down to 35 hours.  If I had doubled the infill to 40% then the print time per housing would have doubled to 70 hours time per part.  Not something I really wanted to do.  So the fiberglass layers seemed like a smart choice.  

After the parts had cured overnight the housing now are strong enough to stand on.  Not that I would want to do that but it's nice to know that the strength is there just the same with very little additional weight gain.


Next the housings were coated with a layer of fiberglass resin and micro-balloons.  Micro-balloons are microscopic hollow glass balls which looks like a fine powder.  This is mixed with the fiberglass resin to form a thick putty.  This putty mixture is then spread on to the parts to fill the weave.  In the photo above the part on the right has the putty mixture on it just after it has been spread on.  After this putty has cured overnight it is sanded down to look like the part on the left.  A much smoother finish that is a good base to prep for primer and later paint.


Here you can see a big difference after one of the housing had been sanded smooth and painted with primer.  Not a hard task to do but it does take some time to get all of the flaws out that the primer shows in the part after it has been sprayed on. 


In order to get a perfect fit of the housing to the body of the dune buggy I first clamped one of the housing to the body just to see how close I was in designing the part.  From the photos above I am pretty happy with how it look and fits but I know it could be much better. 


I removed the housing from the dune buggy and covered the area where the housing will be mounted with a 3mil layer of plastic.  I then cut a hole for the housing so that it again could be re-clamped on to the body as before.


Here the housing is once again clamped into place.  The reason for the plastic covering the body is so that I can use my putty mixture once again to get a perfect mating surface created on to the housing that will match the dune buggy body shape and then be able to remove it without causing any damage to the body itself. 


In the photos above you can see the putty mixture has been spread on to the housing and plastic covered body where the two part meet.  This will give me a perfect copy of the body shape so that there will be no gaps between the body and the tail light housing once it has cured and been sanded smooth for paint. This will give me a perfect fit when I mount the housings once they have been smoothed and painted. 


I left the putty cure overnight and this morning I was able to remove the housing from the dune buggy with very little effort.  As you can see from the photo above it also left very little of the putty on the plastic as well. 


This is what the underside of the housing looked like once it had been removed from the dune buggy.  The micro-balloon and resin putty had fully hardened and actually tapers down toward the center of the part from the outer perimeter. 


I then used additional putty to finish this putty edge taper so that it feathers out thinner as it gets closer to the large opening in the center of the apart.  I will let this cure again overnight and then start sanding the part once again on the outside surfaces to get it as smooth as possible for painting. 

In this next week I hope to have the housings smoothed and painted and then I can begin final assembly of the tail lights for the dune buggy. I also tallied up all the hours that I 3D printed parts for this project including the housings for the front signal lights.  The grand total came up to 101 hours.  I'm very happy to have all of the parts turn out as well as they did so I can keep the project moving right along.  I'll make sure to let you know how it all turns out in my next post.  Good luck with your latest project!

Wednesday, June 5, 2019

New LED Dune Buggy Signal Lights Project

With all that has been happening here at the shop over the past few weeks I was not even sure I was going to find time to get this post out to all of you.  So with the few minutes that I have free while making parts for this project I put everything else aside that needed to be looked at around my house to let you know what has been happening. 

The big delay in getting any of this out on the blog has been having to put a new roof on my house along with correcting a good portion of the wiring that either did not work in the house or had no switches to turn things on and off where it was convenient. Plus now I've found out that a very large tree in my front yard needs to be cut down.  So finally here is the project. 

I had thought that I was done with all the projects that I wanted to do on my dune buggy until I found out that the rear signal lights in the little beast simple were not working or were barely working depending on how you look at it.  The front signal lights worked fine and this was the good news.  The bad news was that the rear signal lights barely worked on the driver's side and not at all on the passenger's side. On  top of this the running lights and brake lights were not as bright as I wanted them. So it was decided to replace all of the signal lights (front and rear) to LED light setups. 


Here are a couple of photos of the signal lights that were on the car when I bought it.  The front signal lights as I said were working fine and they looked OK so I was happy with them at that point.  The rear signal lights shown in the photo above are the ones that I have issues with. From what I can tell the rear lights are what are used in a trailer and the bulbs in them cannot be replaced.  They are a sealed beam setup.   This plus the fact that the rear portion of the body tips forward and makes the lights shine upward as well as out to the side of the car.  Not a good thing for dim lights in the first place. 


I started with the front lights as this was the simpler of the two sets to replace as I knew that they worked and it was just a matter of finding some nice LED lights that would look good to replace the old ones.  I tracked down the new lights that I thought would do the job only to find out that the original hole for the old lights were to small to fit the new lights.  So some design work needed to be done to create a housing for the new lights as I did not want to try and cut larger holes into the car body. 


This is what I came up with.  I designed the new LED light housings so that they would be inserted into the original holes that were already in the body and also use the existing smaller bolt holes for the housing that were already in the body as well.  The new 3D printed housings turned out very well as you can see and only needed to be smoothed and painted gloss black to be ready for mounting.  I also designed the housings so that the new LED lights would point directly forward for the best visibility while driving.


Here is the new LED light with the housing, rubber mount for the light, as well as a small foam rubber gasket that is mounted between the body of the dune buggy and the light housing.  This little gasket I made using my laser cutter.  The foam rubber I had found at my local Walmart store in the craft isle and it is exactly what I needed for this project. 


Here is what the new LED housing looks like just after I mounted it to the body using 6-32 bolts and lock nuts. Already a big improvement over the old lights. 


 The LED light at this point is held in place with a rubber mounting ring that is slid into the housing first.  This rubber mount locks itself in place and looks good as well.  The LED light and it's wiring were then fed through the housing to the underside of the fender where it was wired up to make it all work properly.   A simple task as the wiring is easy to get at. 


Here's how it all looks with the headlights on.


Again another look with the signal light flashing.  A much brighter setup than the original light that I had in the dune buggy.  So the project is half done at this point. 


To get an idea of what was needed for the rear tail lights I started simply by laying out a foam core box that fit up to the tail end of the dune buggy.  I know it looks crude at this point but it gave me the information that I needed to work out the design for the new rear LED tail lights. 

The foam core box layout gave me the dimensions of all the sides of the housing for the new LED lights.  Each side was a different shape and dimension and this was the simplest way to figure all of that out short of being able to 3D scan the rear end of the dune buggy.  Something that would have been nice to use but not in my budget to own.  


The new tail lights that will be installed into my dune buggy are for a 1965 Mustang.  I really like the looks of the lights and an LED insert was available which made the setup an easy choice for this project.  

After working with my brother who owns an auto body shop we tracked down the problem to the original tail lights. To put it simply the dune buggy had a bad ground or at the very least a poor ground.  To solve this issue I ran a test wire directly from the negative side of the battery to the new lights.  I tested this setup and turned on lights, stepped on brakes, and fired up signal lights and it all worked perfectly!  So that is the plan of action.  I will run a new ground wire to the tail end of the dune buggy to make everything work the way it should. 


To get the tail lights pointed in the right direction I have designed a new housing (shown above) for the lights that will be mounted to the body. A much smoother design from the foam core box to be sure. This was a trick in itself as the housing could not be mounted to the body with the light already installed into it. Or the light could not be installed into the housing already mounted to the dune buggy.  


T
o solve this problem I split up the assembly so that the tail lights could be mounted as shown in the image above. The Light Cowling is first attached to the Dune Buggy rear end using four small nuts and bolts.  Then the Light Bucket is attached to the front of the Cowling Face Plate.  The LED Assembly and Bezel are next and they are attached to the front of the Light Bucket.  Once this is done the Cowling Face Plate is attached to the Light Cowling using two small nuts and bolts on each side of Light Cowling.   

All that is needed after this has been accomplished is to hook up the wiring and I will have new LED tail lights on the rear of the dune buggy.  At that point I will be able to breath a sigh of relief knowing that I will be seen when I want to drive the dune buggy and make a turn or stop and not have the worry so much about having an accident because of poor lighting.

I have a bunch of 3D printing to get at for this project yet so I will close for now but will post more about my progress once I get a bit farther along with all that needs to be done.