Saturday, February 23, 2013

Drawing Cars Once Again

  Quite a few years ago I had a business where I created pen and ink drawings of British sports cars. Fourteen different cars in all. I went from selling drawings to t-shirts and finally to clocks.    I was happy when the business took off in a big way and made me some money for all my efforts. I was actually having fun and shipping my wares worldwide. Which in itself was amazing that I could do such a fun thing and make money at it too. This was the good news as another one of my hobbies actually turned into a real money making business.  The bad news was I was also working another full time day job and trying to run the business at the same time.  It got to be more like working two full time jobs and I did not have enough time to create anything new for the business. Up at the crack of dawn and working until 9 or 10 every night got old quick. So after seven years I closed the British business down, took the cash I made and went on to other things.  I got the urge over the past couple of days once again draw another car but this time a concept car. It's been some time but I think the drawing turned out pretty well for not having done this type of work in a lot of years. 
  As you can see from my efforts here and all the other things that I have posted on my blog that I have a wide and varied interest in a lot of different things.  My son is very much like me in that respect and we are both on the same page when it comes to this subject.  We both agree that it is not that we do not have anything to do.  More like we have so much that we want to do that there is not enough hours in a day sometimes to deal with it all.  That is a good thing I think.  I'd rather be that way than never having a clue as to what you want to do in life and then regretting it later.  Thank the good Lord that I am retired.  Now I can play to my hearts content and keep my creative side moving forward.  Hope you like the drawing. I'm already working on my next project.  Have a good day tinkering, drawing, dreaming, planning, or anything else that puts a smile on your face. 


Thursday, February 21, 2013

Another Day Another Simple IPad Project

  I was working at my computer today and I wanted to look at some information that I had stored on my trusty iPad.  This information was a PDF file that I needed to read that would help me with a procedure that I wanted to do on my computer.  The problem that I had was that I could not hold my iPad up to read the information by itself.  So another little project came to light immediately.  I needed a stand to hold my iPad for me.  There are probably hundreds if not thousands of IPad stands on the market but none of them in my home.  Time to start designing one that I could print on my Makerbot 3D printer.  This is what I came up with. 


 The stand is designed in three pieces so that it can be stored easily when not in use and if it got broken I could just replace the damaged part.  The red cradle pieces hold my iPad easily and securely without my having to remove the protective cover that I have on it.


 To assemble the stand all I needed to do was slide one of the keyhole shaped white arms into the receiving holes in the rear of each of the red cradles.  These receiving holes a made just slightly larger so that the arms slide in smoothly with just enough of a friction fit to hold everything in place securely without struggling to assemble or take the assembly apart. 


As you can see the iPad can be easily positioned either vertically or horizontally in the stand.  It took around three hours to print the design using my 3D printer and about $3.00 worth of plastic.  The best part about it is that I did not have to drive in the winter snow to find a stand that would have cost me at least three times as much.  Bragging rights always score big points here at the Tinker's Workshop too so that is another plus.  Already my 3D printer has been paying for itself with small projects (as well as large ) like this one. Gotta love it.

Wednesday, February 20, 2013

Point & Shoot Camera Sun Hood Project

Once in a awhile a project comes along and everything just seems to fall into place right out of the box.  This has been the case with this little project that I put together yesterday.  I had just finished a similar project for my video camera the day before yesterday when I realized that a sun shield could be made for my little point and shoot camera as well.  So this is that project. 


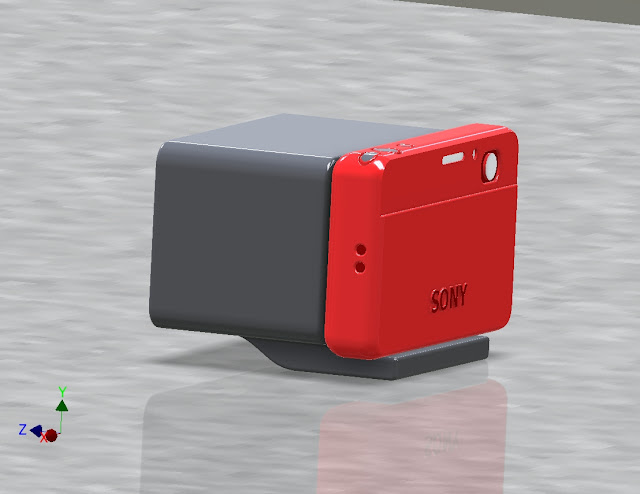
 As with all of my projects that I create I start designing my ideas on my computer using my CAD software.  In these three photos the camera and new sun hood were modeled using Inventor 2013 software. I modeled the camera in red only to show some difference between it and the sun hood.  I really like the detail from the software that you see in these images. Leaves nothing to the imagination as to what I am trying to create.  


Next I took the computer model that I created and converted the file to a STL (stereolithography) file that my Makerbot Replicator 3D printer could understand.  The STL file is fed into the software for the printer where it is sliced into layers.  These layers are read by  the 3D printer.  Each layer is only the thickness of six human hairs when it is printed.  The new Makerbot Replicator 2 (I have a the first Replicator) prints at the thickness of only one human hair.  That machine is on my wishlist for the Tinker's Workshop.


 Here the camera and the sun hood are mounted together ready for use.  The sun hood only weighs 1.5 ounces and cost just $2.25 to make including the cost of the small bolt to hold the hood to the camera.


The camera and sun hood now upside down shows how they are mounted together. The sun hood is held to the camera using a standard 1/4-20 bolt that is 1/2 long and threaded into the tripod mount.  This holds everything together nicely and is simple to put on or take off the camera.  


As with the video camera sun hood that I designed a few days ago this new sun hood for my digital camera will make a nice accessory. Both of them will make it a lot simpler to shoot photos and videos outdoors once again.  The sun hood mounted to the camera still allows me to turn the camera on and off, zoom in or out, and of course shoot the picture.  The hood also feels nice in your hands as it was printed all in one piece and is very smooth to the touch.  Feels like a little digital box camera now.  
  The sun hood was made specifically for my Sony digital camera so I doubt that it would work on a different camera.  Maybe but I doubt it. I would have to make the next version more universal so that it could be used on a lot of different point and shoot cameras.  It's a thought but for now this will work with what I now own and so it fits my needs very well.  So unless I get a lot of requests for this item I will hold off on designing a universal hood for now.  Let me know your thoughts on this or  anything else that I've posted and I'll be more than happy to hear from you and go from there.  Have a good day tinkering.

Monday, February 18, 2013

Inexpensive Video Camera Sun Shield Project

Of all the times that I have tried to video something outside I always find it hard to see what I am looking at using the flip out screen on my video camera.  The sun 99 times out of 100 will wash out the screen and it is just a matter of luck that I get the shot that I want to get even if I do try to shoot it.  So over the past couple of days I played around with an idea that was stirring in my head to solve this problem using my 3D printer.  The new attachment had to be light weight, easy to store when not in use, and also inexpensive. Plus it had to not look clunky on my video camera when I was using it. A tall list to be sure. So here is what I came up with. 

 The video camera (in red) has a flip out monitor.  This is then enclosed with a collapsible sun shield made of light weight plastic (in blue).  


The enclosure is held in place using two "C" shaped pieces (in yellow) again made of light weight plastic.  


Here is a couple of views of the sun shield without the video camera inserted into it.  To protect the video camera flip out screen from damage a soft padded recessed area on the top and bottom edges of the sun shield  are added to the assembly.  (Notice the black strip on the lower blue part in the image above.) 


Here the sun shield is folded flat for easier storage when not in use. Once I had the design figured out I started printing the parts on my Makerbot 3D printer.  This took about four hours to complete and the only additional hardware that I needed for the assembly was two 8-32 machine screws that were two inches long.  That and about six inches of Velcro for the protective padding of the video camera flip out screen to slide on to.  


Here is what the assembly looked like after I had printed all the parts on the 3D printer.  The assembly is 3 1/8" tall, 3 1/2" deep, and 4 " wide.


This is what it looks likes once it is flattened out for easier storage. The machine screws hold the three main parts together through hinge points.  This allows the parts to pivot so that they can be folded flat or at least nearly flat.  In this configuration the upper assembly is 5 3/4" long, 3" wide, and 1" thick.  The "C" shaped pieces stacked up would be 1/2" thick, 3" x 3 1/2" in size.  


The dark strip in the top section of this piece is actually a strip of Velcro with the fuzzy side up.  The upper and lower parts of the assembly that needed this strip have a 3/4 wide channel with a double lip on the outer edges that I was able to design into the part so that the Velcro could be slid into it.  It was just the right size to hold the Velcro in place without glue yet not so tight that it was difficult to install.  This makes a nice soft padded strip that rests on the top and bottom edges of the video camera's flip out viewfinder. 


I was really glad that I printed the sun shield in black as it does not detract from the look of my video camera once it is installed.  I weighed this new assembly and it is a very light 3.2 ounces!  With it in place the flip out viewer still is able to rotate up or down freely and with the padding on the inside channels for the viewer of my video camera will not get scratched by sliding the sun shield on or off.  The "C" shaped pieces have the right amount of pressure on the upper and lower parts of the assembly so that it will not slide off of the flip out viewer by itself if the video camera is tilted in that direction. So this was another goal met when working on the design. 


 This photo says it all.  Here is a shot of what you see in only fairly bright sunlight without the sun shield mounted on the video camera.  Poor at best.  I know it will only get worse in absolute bright sunlight. 


This is what can be seen using the sun shield on the video camera.  What a difference!  You can even read the icons on the screen. The best part about this project is that it only cost around $5.00 to make using my 3D printer and a couple of little machine screws.  This will make taking video outside much easier and I will get the shots when I want to now without guessing if I got the shot at all.  
  With this project another idea has come to mind that ties right into this one.  I also shoot still photos with my little point and shoot camera.  You guessed it.  It also has a video screen that is worthless in bright sunlight.  So back to the drawing board once again to see what I can come up with for that camera.  If I get it figured out I'll let you know about it here as usual.  Until then I'll be outside shooting video!  Stay tuned for further developments.

Get The Sunglasses Out. Bright Paint For The CNC Computer Desk!

The CNC computer desk is now completed with a rather bright paint job!  I finished painting the desk over the past few days and just now have gotten the computer monitor mounted to the vertical arm.  The desk is solid and rolls around easily with the caster wheels.  The paint turned out to be more orange than red but no matter what it still looks great and adds a lot more color to the Tinker's Workshop. Check out the photos.


Here I am relaxing just after construction of the desk was completed.  This gives you a good idea of how big the desk is and how well it works with my shop stool.  Just the right height and size.


The desk was next painted with white primer.  I did not paint the inside guides of the drawer as this was not needed and I suspect that the paint would more than likely made it more difficult to open the drawer. So I left it alone and the drawer glides in and out perfectly. The desk top at the time of this photo had already been painted with semi-gloss white paint.  I let it dry for a couple of days and then taped it off so the rest of the desk could be painted without messing it up.  You can see the monitor support laying on the floor next to the desk in the first photo which also needed to be painted for the project.


The drawer front in this photo is painted also with white primer.  Again I did not paint the rest of the drawer as it simply did not need to be done. 


 The computer desk is complete with a very bright redish-orange paint.  I planned on the desk to be just red but this color works for me also.  Always good to have something just a little different.  


 My taping job on the desk top worked out perfectly and with the bright orange paint it really stands out in the shop.  The monitor and mount on the vertical support is nice and clean looking as well. With the adjustable arm for the monitor it will be nice to be able to swing the monitor in whatever direction I want it to be.


 The drawer still slides in and out the way it should without any problems.  I added a simple black handle for the drawer to match the rest of the hardware that is on the desk.  


These last two photos are some nice shots of the completed desk ready for use.  It turned out very well and I suspect it will last me for a very long time while using my CNC machine.  Some people would probably rather have had the desk stained and varnished as it really looks like a piece of furniture.  But being as it will be in the workshop I did not see the point in going to that level with the desk.   No matter what the desk will be a nice addition to the workshop and will work will with the CNC machine when I get it back up and running again.  I'll cover it up and tuck it aside in the workshop for now until then. With the bright orange paint I am sure that I will be able to find it in the dark should the lights go out some stormy night. I'll have to keep my emergency flashlight in the drawer for just such an occasion.

Complete plans for this desk are now available for sale on the plans page of this blog for only $10.  Go to the top of the page and press the "Plans" button to see how to place an order.  You'll also find other great plans that may interest you as well.  Check it out!

Sunday, February 10, 2013

CNC Computer Desk Project Nearing Completion

Today again I was able to make some nice progress with my CNC computer desk project.  All the planning and design work again paid off as parts lined up very well during this portion of the construction.  So here is what I managed to accomplish with the project today.


The first thing that I worked on was the cross brace and drawer rails for the desk.  The original computer model did not have the cross brace but after getting to this point in the construction I thought it was a good idea to beef up the desk and make it more solid.  This was a simple task of adding an additional 23" long 2 X 4 that was mounted between the drawer rails using pocket holes and wood screws just like the rest of the assembly. 


 The drawer rails were mounted from the underside of the mount and were screwed into the assembly with three wood screws each.  Quick and simple just the way I like it.


The desk top was the next step in the assembly.  This 3/4" plywood panel matched up perfectly and so all that needed to be done was to mark where I wanted the wood screws to be mounted.  I drilled out all of the holes and countersunk each of them using my drill press.  This took a little time but with the drill press I was able to make sure everything was perfectly lined up when I mounted the desk top.


I took the drawer assembly and slid it into the opening for the desk and it was a perfect fit.  Slides in and out without a problem. The handle for the drawer will be added in the final assembly of the desk once it has been either painted or varnished.  Not sure yet which that will be for now. The desk at this point could be done but I think it is just to simple looking.  The addition of the back and side panels really make the difference as you will see as I progress with the construction in this post.   


Next the back of the desk was added to the framework.  This as before was marked for hole placement and all were drilled and countersunk at each location.   Throughout this portion of the assembly 1 1/2" wood screws were used to hold everything in place. 


The rear panel had already had the four mounting holes for the vertical monitor support drilled in their correct locations.  Once this panel was mounted to the framework I used these holes as guides that matched the cross braces at the back of the desk.  The cross braces had to be drilled all the way through so that the mounting bolts could hold the vertical monitor support in place.  This will make more sense when you see the final assembly of the desk and the vertical monitor support is attached to the desk.


The side panels for the desk were the last pieces that were mounted today.  Like all of the other panels everything lined up very well and they were mounted using wood screws as before.  


Even the back of the desk looks great.  It always is a good thing when a design comes together this nicely.  I will have to mount the casters that go on the bottom of the desk next and double check the vertical monitor support for alignment.  This should be a no brainer as the vertical support was a guide for the rear panel which was a guide for the 2 x 4 cross braces in the assembly.  Just really want to see how it will look like before I tear it apart for the finishing work.  I'm very close to finishing this project now as you can see so it will not be long before I am able to put it to good use with my CNC machine.  The desk now has added a bit more weight which is not a bad thing as it will be really solid and strong.  The casters will help in moving the desk if I have to while cleaning up the workshop. I'll post the completion of the CNC computer desk project in my next post which should be very soon.  Check back here to see how it all turns out.  Have a good day tinkering!