
It's been a little while since my last post so I thought I should get this out to everyone while I am feeling ambitious tonight. So here are the latest updates on the projects that I have been working on over the past couple of weeks.
QC Co-Lab Maker Space CNC Build
Tomorrow I will be returning to the QC Co-Lab to continue the build of the CNC machine that I have been working on and have posted info about over the past month or more. Progress is still being made on the CNC build and the only hold up at this point is waiting for all the miscellaneous electronic components, connectors, hardware, etc that needed to be ordered online to show up. I will be putting together part five of the video build once I have enough footage to make it worthwhile to even look at. So don't dis-pare the project is far from being given up on. (Heavens No!) It is all coming together nicely and I will post the lastest and greatest info once I am happy with it all.
Plexiglass Clock
While I have been waiting for parts for the CNC build I have been busy working on a couple other smaller projects. One of these being the Plexiglass Clock project that I posted a Blender 3D model of a few weeks back. This project is coming along nicely also as I have been using my CNC machine here at The Tinker's Workshop to fabricate some of the first parts that are key to the design.


Video Camera Steadicam
For most people who are not into making their own movies with a video camera the term Steadicam is something they have never heard of but surely have seen in almost every movie that has been made over the past 10 or 15 years. This device allows anyone to create very steady shots to get professional results with their video. A good example would be a shot of a guy running down the street and the camera in either following him or in from of him. If you try doing this kind of shot without the steadicam your video would be bouncing up and down as you ran with the camera. The steadicam eliminates this up and down motion to give you great looking video.
I am in the process of making such a devise for my video efforts and have most of the components put together at this point in time. A professional Steadicam can cost big bucks and is way out of my league when it comes to that kind of equipment and cost. I was fortunate to come across a video online from another website called The Frugal Filmmaker. I am in the process of building his design with just one little improvement. The design called for a PVC arm to be built but I thought it would look a lot more finished if I made a composite one using fiber glass. I will post photos and the use of this devise once I am farther along with it's construction also. Oh and by the way the steadicam will only cost me around $40 or so. Quite a savings to say the least.
QC Co-Lab Maker Space CNC Build
Tomorrow I will be returning to the QC Co-Lab to continue the build of the CNC machine that I have been working on and have posted info about over the past month or more. Progress is still being made on the CNC build and the only hold up at this point is waiting for all the miscellaneous electronic components, connectors, hardware, etc that needed to be ordered online to show up. I will be putting together part five of the video build once I have enough footage to make it worthwhile to even look at. So don't dis-pare the project is far from being given up on. (Heavens No!) It is all coming together nicely and I will post the lastest and greatest info once I am happy with it all.
Plexiglass Clock
While I have been waiting for parts for the CNC build I have been busy working on a couple other smaller projects. One of these being the Plexiglass Clock project that I posted a Blender 3D model of a few weeks back. This project is coming along nicely also as I have been using my CNC machine here at The Tinker's Workshop to fabricate some of the first parts that are key to the design.


These first four photos are of the vertical support mounts for the internal workings of the Plexi-glass clock. The first photo shows one of these supports on my CNC machine. Both of these pieces turned out beautifully and match perfectly for the design.


The support pieces were then spray painted gloss black on all side and left to dry. The reason for the black paint will make the display show up better once the clock is fully assembled.

These three pieces make up the back of the inner display case and will be mounted together to form the inner box holding the plex-glass numbered blanks.


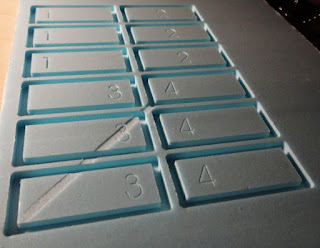
These three shots show you why I cut out the first test pieces in styro-foam. This is much less expensive than ruining a good piece of plexi-glass only to find out that something is not right. Notice in the second photo that there is a diagonal cut in the bottom right # 3 pieces. This was a perfect example of why I run a test piece before I commit to a final run of my gcode for the CNC machine. I had an error in a line of code that caused this cut that was not intended to be there in the design. Time well spent and money saved for sure.
I'll be posting more photo and possibly video of this project as I progress further with it.
Video Camera Steadicam
For most people who are not into making their own movies with a video camera the term Steadicam is something they have never heard of but surely have seen in almost every movie that has been made over the past 10 or 15 years. This device allows anyone to create very steady shots to get professional results with their video. A good example would be a shot of a guy running down the street and the camera in either following him or in from of him. If you try doing this kind of shot without the steadicam your video would be bouncing up and down as you ran with the camera. The steadicam eliminates this up and down motion to give you great looking video.
I am in the process of making such a devise for my video efforts and have most of the components put together at this point in time. A professional Steadicam can cost big bucks and is way out of my league when it comes to that kind of equipment and cost. I was fortunate to come across a video online from another website called The Frugal Filmmaker. I am in the process of building his design with just one little improvement. The design called for a PVC arm to be built but I thought it would look a lot more finished if I made a composite one using fiber glass. I will post photos and the use of this devise once I am farther along with it's construction also. Oh and by the way the steadicam will only cost me around $40 or so. Quite a savings to say the least.
In the meantime here is the video of what it is and how it works from The Frugal Filmmaker website.
No comments:
Post a Comment