This weeks brings a lot of design progress to this project. With the body panels pretty well done along with the front suspension starting to take shape the hours I put into the design are coming together.
Here's a good view of the Fusion 360 model as of this morning. It is starting to look like a proper Bugatti Type 35 so I am happy for that much.
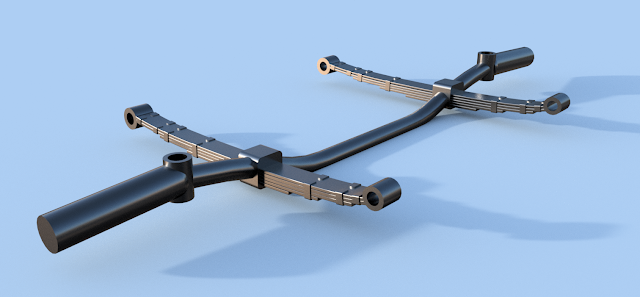
I have to keep reminding myself that this will be a model and not an actual car that will be assembled like a real car. The perfect example of this is the front suspension that you see pictured above. In a real car the front axle and leaf springs are assembled separately and then finally together. For the model it is much simpler to combine these to assemblies into one single part that will be 3D printed.
I took great care in modeling the leaf springs. I want them to look like the real thing in the model rather than just a simple representation of the assembly. This was not an easy task as it took me a little more than a day to get them modeled as you see in the image above. In the model the leaf springs are only around three inches apart so hopefully all the detail that I have modeled hear will not be lost because of the size of the model when I 3D print it.
In this view you can see the detail again in the leaf spring along with the front brake assembly and the tie rod connections. The arm on the right side of the brake drum will be connected to a small cable that would pull the arm rearward when the brakes would be applied. Hopefully I can get the cable installed in the model using a small piece of wire. That is the plan anyway.
Here's another view of the front end of the Bugatti with most of the suspension installed along with the steering setup. In the first image in this post you can see a piece of sheet metal that is in front of the radiator. I left this part off in this image so that you could see the suspension setup easier.
Among the other features that I needed for the model was the gas cap pictured above. This image was created using Fusion 360 CAD software. Looks really close to the real thing in this image. Nice but I only wish that I could make this part as you see it here. The part in the completed model will be quite small and I will not be able to smooth it out as perfectly as you see here. That would take an SLA 3D printer and then have to be painted chrome on top of it all. I will have to settle for my FDM 3D printer and leave it unfinished.
Here is another good example of what Fusion 360 CAD software can create with this image of the radiator cap and temperature gauge that I designed for my Bugatti model. Again it would be very difficult to get this as smooth and finished with the 3D printer that I own so I will have to settle for the best that I can do when I complete the model.
All five of the tires had taken me 43 hours to 3D print. I managed to get some nice detail in the tires by splitting them down the middle, 3D printing them and then gluing them together. This gave me nice clean tires on both sides and the seam down the middle of the tire is almost invisible so it will look really good once the model is completed.
All in all the model of the Bugatti is coming along nicely. I have not been keeping track of the hours of work that I have been putting in using Fusion 360 CAD software at this point. The best guess is that it is in excess of 100 hours already and I know that I have a long ways to go before I can say the design is completed and I can plan on 3D printing all the parts to assemble the model. A real challenge to be sure. I'll keep you up to date with further postings on this project.


No comments:
Post a Comment