Wednesday, January 30, 2019

The Tron Light Cycle Project Revisited


Around three years ago or so I had thought of 3D printing a model of the Tron Light Cycle.  For those of you who have never heard of this vehicle it came from a SciFi movie of course named Tron.  

In the SciFi movie the main characters drove vehicles called light cycles.  All done in special effects of course and looked like enclosed motorcycles that traveled at high speed leaving behind a light streak that no one could pass through.  The good guys would chase bad guys eventually corning the bad guy in with the light streaks where he would crash and die.  That was the highlight of the movie and was about the best that the movie had to offer. The movie itself was not one of my favorites but the vehicle has always stirred an interest in me so the project was seriously looked at when I first modeled it using Fusion 360 software. 


The two images that you see above are of my Fusion 360 Tron Light Cycle.  Fusion as you can obviously see makes my 3D computer model look real enough to touch in these images so it inspires me to look at making the computer model a real 3D printed model.  

At the time I modeled the light cycle I did not have a 3D printer large enough to make it the size that I had in mind.  I wanted the model to be 24 inches long.  This was not possible to make with the smaller 3D printer that I had owned at the time mainly because of the mid-section of the cycle would have been impossible to make to that scale.  

But now I own a much larger 3D printer capable of making much larger parts that are at least 80% as large as I want them for the light cycle.  This would make it possible to make a light cycle that would be 21.4 inches in length!  Close enough to satisfy working out the rest of the design to possibly start building a real 3D printed model of the light cycle. 


My idea for the new 3D printed model of the Tron Light Cycle is to hollow out the interior of the body of the model and install a red Plexiglass panel at the rear tire and then light it from inside of the model.  This would make the Plexiglass glow and give me a light streak effect.  A nice effect if I can get the logistics of the model worked out.  The picture above gives you a good idea of how the effect would look once the model was completed. 


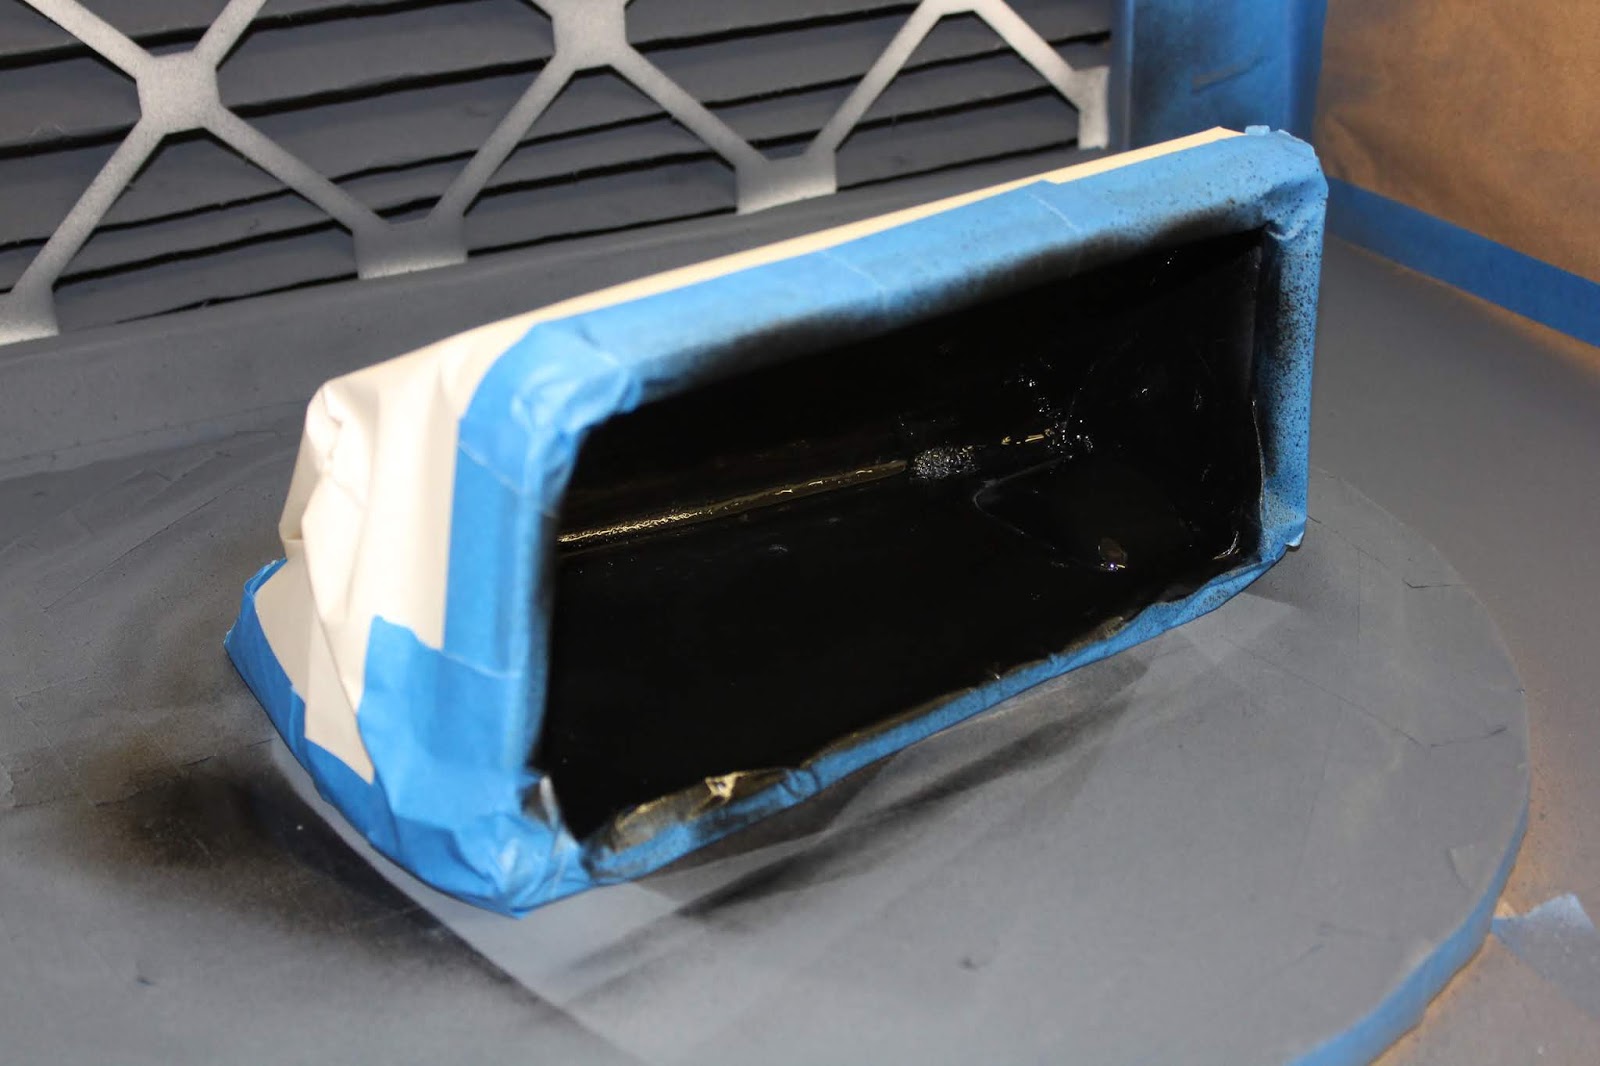
In the image above you can see a cut-away view of the center section of the light cycle.  After looking at my original Fusion 360 model yesterday I was able to clean up some of my original design and start working on solving some of the problems with my model.  First off having the center section be hollow.  This as you can see I did manage to work out and am happy with the fact that there is more than enough room for a power supply or batteries for lighting up the model and the light streak Plexiglass panel at the rear that I have planned.  

I was also able to combine some parts for the model.  The rear black section of the model that you see pictured above originally was to be made in two halves.  I was able to combine these two pieces into one so 3D printing and assembly will be simplified.  

The overall dimensions of my version of the Tron Light Cycle looks to be coming in at 21.36" long, 6.4" wide, and 8" tall.  This does not include having a Plexiglass light streak coming out of the rear of the model.  It should be pretty impressive if I can get the computer model worked out in Fusion 360. 

The light cycle also will take quite some time to 3D print.  The mid-section would be 3D printed in two halves and then combined in the final assembly.  Just to 3D print one half of the mid-section will take approximately 40 hours. I still have a long way to go to figure out the total time to 3D print the model but so far it looks to be like the model will take a very long time to 3D print. But it still looks promising and since the weather outside to day is 25 degrees below zero it also looks like a good day to work on this project.  I'll let you know if I get the bugs worked out of the design before giving the go ahead with actually making this large display.  Stay tuned and stay warm.

Friday, January 18, 2019

The New Glovebox For My Dune Buggy Is Completed!

About three weeks ago I put out a post about my glovebox project for my dune buggy.  I am again happy to report that I put the finishing touches to the project yesterday and have it fully installed into my little buggy.


This is where I left off on the last post.  The outer frame for the door had been attached to the body of the glovebox.  In the bottom of the glovebox you can see a cutout that was needed to allow room for a mounting point that is on the roll cage in the car.  Without this cutout the glovebox could not be installed.


To clean up the opening that I had made for the roll cage mount I 3D printed a small blister that would be mounted over this opening.  This as you can see was a very small part so it took very little time to get it sanded smooth so that I could put a nice coat of primer on it. 


This is how the blister looked once it had been mounted on the inside of the glovebox.  Already a big improvement over the hole that was there. 


Next I had to check out the clearances for the door for the glove box along with the mounts that would only allow the door to pivot 90 degrees when I wanted to open it.  This all worked out fine as you can see.  The door handle/lock mounted up fine but I still needed to make sure that the latch for the door would work properly.  


For the glovebox I tracked down an original door handle/lock from a Volkswagen Beetle for it online.  This was new old stock and cost me less than $20 so it was just what I needed. 

 I knew that I did not want the striker for the lock to be made completely out of ABS plastic from my 3D printer.  The striker needed to be made out of metal otherwise the parts would wear out very quickly.  I created the striker from a small piece of aluminum I had in my supplies in the shop.  It took me a little time to make but in the end I got a very nice striker put together.  

The yellow part in the upper image is the striker slider. This part mounts the striker to the inside of the glovebox and is adjustable so that the door locks correctly.  This little part I had to reprint on my 3D printer after my first attempt failed simply because it needed to be more solid.  The original part had only a 20%  fill.  With this being that hollow it broke after only a couple of times trying to adjust it.  I then modified the design just a bit to beef it up and increased the inner fill to 80%. This made the part very solid and strong that should last a very long time now.  


With the new door handle/lock and latch assembly the door open and closed properly now.  In the photo above the glovebox is really coming together with primer now being applied to the door. 


The next process in the project was to getting the mounting holes drilled for the glovebox so that it would be set up for the car when the assembly was completed.  I placed the glove compartment into the cavity in the dash where it would be mounted and then marked where I needed the mounting holes. The little blister in the interior of the glovebox worked out perfectly to at this point so the glovebox slide into place with no problems.


After having drilled the mounting holes for the glovebox and making sure all of the hardware to mount it worked properly I then returned to my little spray booth and started priming the glovebox inside and out. 


After I had primed and sanded and primed and sanded the glovebox three or four times I was finally rewarded with a nice smooth exterior ready for paint.  I knew that I wanted to black out the interior of the glovebox so I taped everything off on the exterior and sprayed the interior a nice semi-gloss black. This turned out very well and went quicker than I had hoped.


Again I repeated this process but in reverse.  I taped off the interior of the glove box and sprayed the outside a nice glossy red.  I was happy that I was able to lay the paint down with no issues and it turned out nice and smooth.  


After the paint on the glovebox had dried for several days I was rewarded with the installation being completed in short order without any major issues.  The paint I had used on the glove box is a very close match to what is used in the dune buggy so another win for sure.  

I was able to mount a black piece of fender trim around the outer edge of the glovebox where it meets the dash and it sets off the installation perfectly.  Like the glovebox had been there since the car was assembled.  Works for me. Now I have the perfect place to store my registration and insurance papers along with whatever else I want to put in this nice new storage compartment.  A perfect addition to the car that blends in nicely with the rest of the dash!

Monday, January 14, 2019

New Bluetooth Wireless Speaker Setup For My Dune Buggy!

With all of the projects that I have been working on recently with my dune buggy this one has been very interesting and rewarding so far to create.  My dune buggy did not have a radio installed in it but had speakers that were either mounted in very bad locations or simply could not be heard because of it's location or the radio was not powerful enough to make it work in the first place.  I removed the offending speakers for several reasons other than just the sound quality being bad.  The speakers behind the seats were less than an inch from the back of the seats so these were the first to go.  The speakers that were mounted in the foot wells would have been ok I guess but made driving the car uncomfortable simply because that speaker took up valuable foot space.  Once I removed the front speakers I was able to regain foot space for driving which in itself was worth the loss of the speakers right off the bat.


But like any other car I have owned I wanted to have a speaker setup that I could hear in the car so that I could have tunes while I was driving down the road or just being parked somewhere.  I came up with the solution to this  problem after I had removed the two front speakers in the foot wells.  

I was sitting in the drivers seat playing with the seatbelt and had a small wireless Bluetooth speaker resting in the passengers seat.  I picked up the speaker while it was playing and held it up close to the roll cage that is mounted in the car.  This roll cage has two connecting roll bars that run from the front roll bar to the rear roll bar that is just behind the seats. These two upper roll bars are placed six inches apart.  A perfect location for a speaker setup.  I raised the small Bluetooth speaker up between these upper roll bars and thought to myself "This is where a new wireless Bluetooth speaker needs to be!".  At that point this project was born.


I immediately started shopping online for my new Bluetooth wireless speaker.  I sifted through the likely candidates and found what I needed with the Tronsmart speaker.  Wireless Bluetooth, Micro-SD card capable, 40 watts of power, 15 hour battery life, and a nice compact size that I knew would work for the project.   I ordered the speaker from Amazon for around $50 and in a couple of days it was in my hands. I charged it up and synced it to my iPad.  This little speaker has plenty of volume so I know it will work for cruising in the dune buggy.  


As usual I dived into designing the new speaker housing for the dune buggy using Fusion 360 software.  I started taking measurements of the speaker itself which is only around 7.5 inches long, by 2.25 inches wide, by 3.25 inches tall.  My setup would lay the speaker down on it's face so the sound would be pointed down toward me and a passenger being as the speaker would be above our heads. 


The space between the roll bars over our heads runs from the front roll bar to the rear roll bar and is six inches apart.  More than enough room to mount the new speaker and secure it properly.  I wanted to be able to turn the speaker on and off and also control volume, song selection, etc. from the drivers seat.  Again the spacing between the bars easily made the new mount you see pictured above possible. 


The speaker mount is designed so that it is bolted on to the roll cage.  The lower portion of the speaker mount has a locking door that is designed to hold the speaker in place and can easily be unlocked to remove or install the speaker when it needs to be recharged after having played for 15 hours of use.  The locking setup was simple enough to secure the speaker so that it cannot be stolen from the car and still can be used to quickly remove the speaker when it does need recharging. 


First I started with the top housing for the speaker.  Here pictured above is this housing with the mounting holes setup for it along with the arms that would wrap over the top of the roll cage when it is mounted. The little window at the top of the housing (bottom image) is needed to be able to access the on/off switch along with the port for the micro-sd card and a couple other ports for audio connections. Inside this housings cavity is adequate room for the speaker to be installed without any issues but not so large as to having the speaker move about in the space. 


The lower portion of the enclosure needed to again wrap around the speaker but also allow access to the volume controls that would be facing the driver.  Thus as you can see the reason for the open side of this part of the enclosure.  If I had closed up this open side the controls for volume and song selection controls would have been covered up making it impossible to use. 


Finally the bottom door was designed with a simple hinge (on the left) and an opening for the lock (on the right).


Stacked all together the assembly looks like the image pictured above.  The hinge would use a simple 1/4" aluminum pin running through the two door mounts (in green) and the centered hinge mount on the lower housing (in yellow).


After 34 hours of 3D printing I had my housing completed.  The top of the housing took the longest as this was a 15 hour long print to make.  I was very happy when I completed this part of the build and that it turned out as well as it did. 


Here you can see the Bluetooth speaker beside the housing with the lower door unlocked ready to install unit into it. 


Here finally is the speaker installed into my dune buggy.  It went in first time without a hitch.  A real pleasure to have it go in so smoothly.  I will pull it out of the car yet and take it all apart so that I can properly sand the housing smooth  and prep it for gloss black paint.  My brother had asked me why I was going to paint it rather than leave it like it is.  I could go without painting it but over time the black 3D printed part would fade with it being out in the sunlight. I then would be forced to paint so now is as good a time as any so I might as well paint it now before I install it for good.  With that being said that will be my next step in the process.  But for now these photos will do for this posting to show you what will be in the car for this summer.  Time to get the sun tan lotion ready and crank up the tunes for some serious cruising!