Wednesday, March 21, 2012

I Told You I'd Find A Use For My Plastic!

  In my last post I was having trouble trying to do some engraving on plastic that was to soft for my machine to engrave.  So now I have a good supply of plastic to do other things with.  Today I succeeded in doing something with the plastic that I have been eager to try ever since I got my CNC up and running.  


Make Gears!  This was my first attempt and this little gear I cranked out on my CNC in about five minutes. The gear here is just shy of four inches in diameter and 1/4 inch thick acrylic plastic.  It was cut using a 1/4 inch bit for plastic running at 15 inches per minute.  Each pass was at .125 inch depth and it went through the plastic smoothly and without flaw. I am still experimenting with the software to create the gears but this one was worth the effort and frustration that I was going through over the past week learning what not to do while trying to engrave parts.
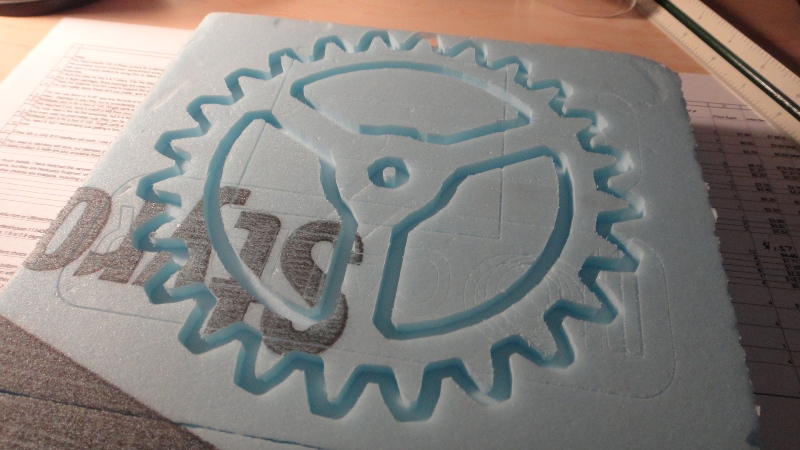

As with almost all the parts I try to make I run a test piece first in styrofoam.  You can learn a lot about what is going on with your design and make corrections easily without wasting valuable material.  This styrofoam gear was close but not quite what I was shooting for so I redesigned the part and the process of how it was cut.  The acrylic gear is the proof that I got it right. I also am learning how to edit the Gcode for the CNC so that the parts cut in the sequence that I want. 
  Now I will have to make another gear to mate up with this first one and get that process worked out.  Being able to cut gears opens up all kinds of possibilities for future projects.  Nice to know my CNC is capable of doing exactly what I anticipated it could do.  Puts a smile on my face!

Tuesday, March 20, 2012

Another Lesson Learned On My CNC Machine

This past week I have been trying unsuccessfully to engrave some plastic that I had purchased at my local Lowe's store. This engraving work was intended for the plexi-glass clock project that I started a couple of weeks ago.
   I could not understand why the engraving tests that I had done at varying speeds continually produced parts that were worthless.  And I am being kind when I use the word "worthless". This was especially confusing to me as I had made some beautiful engraved lit angel displays for a couple of my sisters this last Christmas.  


This photo shows how badly the engravings are now turning out.  I spoke with my good friend Steve Hamer from the QC Co-Lab maker space in Davenport Iowa and asked him what kind of acrylic plastic he was using as it worked wonderfully for my angel displays.  What we found out was that the plastic is indeed acrylic but it is "cast" acrylic. Before I had found this out I had already purchased a nice sized piece of poly-carbonate plastic.  I thought surely this would be harder than the Lowe's plastic which by the way is a rolled acrylic not cast.  


That blob on the end of the bit is what happens when you try and engrave poly-carbonate plastic as well.  Just like the rolled acrylic the engraving bit melts the plastic. At least it does on my CNC machine anyway.  
  The answer to the problem here is that the CNC machine has to run a lot slower to do engraving in these softer materials.  Something like 800 rpm on the spindle and 10 inches a minute travel. I can run the travel speed this slow but it is far to slow for the spindle speed on my machine.  I would be lucky to go half that speed with the DeWalt trim router that I am using even with a speed control. So I will have to track down some cast acrylic as I know this will engrave properly at the speeds that I am able to run at. 
  The good news about all of this is that I now have a nice supply of the acrylic and poly-carbonate plastic on hand that will not go to waste.  These sheets I know cut very well using a plastic cutting bit in the CNC.  I will use them for plastic gears, parts, etc that would be great for toys or any other gadget that I would normally use wood on.  I hope all you guys reading this post and who are just starting out with your new CNC machine have learned something here today.  I know I have.


Saturday, March 17, 2012

New Progress On The QC Co-Lab CNC Machine Build (Part 5)

  I finally have gotten this video put together of the progress that has been made over the past several weeks of the David Steele "Solsylva" CNC machine that I have been building for the QC Co-Lab maker space located in Davenport Iowa.  If you have not been following the blog over the past couple of months you will want to look at earlier build videos that I have posted here on my site.  This video is part five of the series and hopefully I will only have to shoot one or two more video sequences to finish the CNC machine and the series.  


Click the YouTube button for bigger video.

  In this video of the build (Part 5) I discuss the progress that has been made and the various features put into the machine thus far.  My friend John Richards was my camera man for the day so it did help out a lot to have someone else behind the camera for a change. 
  We have all the components to complete the machine except the electronics and the stepper motors that are still on order.  Hopefully these parts will show up quickly and the build can finally be wrapped up.  Then the Co-Lab will have another fine piece of equipment to create some new high tech gadgets that I can write about here on the blog.  No matter what I will be happy to get this project done so I can move on to the next in my long list of things I want to build.  Stay tuned!
  

Friday, March 9, 2012

Improved Video Steadicam Arm

  In my last post I showed you a video clip of a video camera steadicam that Steve Eggleston has on his blog site "The Frugal Filmmaker". He had created this wonderful video tool for a very affordable $40.  I liked the design up until I saw the PVC arm that he had used in the design.  This was done to reduce cost I am sure but I knew that I could improve on the design and make the entire unit much more finished and professional looking.  So this is what I came up with.


  As you can see from the two photos my steadicam arm runs circles around the PVC arm as far as looks go.  It also is many times stronger and only a little bit heavier than the PVC unit. 


 The new improved steadicam arm is made up of three main layers of 1/4 inch plywood which I designed and cut out using my CNC machine.  Between each part I laid in a single layer of 8 oz. fiberglass cloth and resign.  Once this was left to cure overnight I then trimmed the cloth and sanded all the edges smooth using a drum sander. Then the upper and lower 1/4 plywood doubler parts were added.  Once these had also cured I sanded all the edges to round them off.  Next I wrapped the entire outside of the arm in fiberglass cloth and resin and let it cure again for another day. 
  I then drilled out the 1/4 inch mounting holes that were needed for the balance weights and to attach the arm to the adjustable mounting platform. The arm was then covered in a fiberglass resin micro-balloon mixture to make a resin putty and left to cure for a couple more days.  
  After all this was done I then sanded the arm smooth using 120 grit sand paper and then again using 180 grit sand paper. When I was happy with these first sanding steps I then started  wet sanding the arm using 400 grit sand paper to get a super smooth finish on the arm.
  A couple coats of primer and more sanding later and I was finally ready to lay down two coats of gloss black paint.  On a scale of 1 to 10 I think this arm turned out to be a 10 for sure. 


   I already have my video-cam and arm balanced and now will plan on getting some practice time in to be able to use it properly.  I know this will take a little time but it will be worth it.  
  The project took me longer to build than the original design but was well worth the effort. Especially when I now own a steadicam that is much stronger, just about as light as the original design and still only cost me around $40 or so to build. When it looks as good as it does and improves on the original design it is always worth the effort. It should last me for a many years to come and always put a big smile on my face.

Monday, March 5, 2012

Progress On The Co-Lab CNC and Other Projects

  It's been a little while since my last post so I thought I should get this out to everyone while I am feeling ambitious tonight.  So here are the latest updates on the projects that I have been working on over the past couple of weeks.  

QC Co-Lab Maker Space CNC Build

  Tomorrow I will be returning to the QC Co-Lab to continue the build of the CNC machine that I have been working on and have posted info about over the past month or more.  Progress is still being made on the CNC build and the only hold up at this point is waiting for all the miscellaneous electronic components, connectors, hardware, etc that needed to be ordered online to show up.  I will be putting together part five of the video build once I have enough footage to make it worthwhile to even look at.  So don't dis-pare the project is far from being given up on.  (Heavens No!)  It is all coming together nicely and I will post the lastest and greatest info once I am happy with it all. 

Plexiglass Clock

  While I have been waiting for parts for the CNC build I have been busy working on a couple other smaller projects.  One of these being the Plexiglass Clock project that I posted a Blender 3D model of a few weeks back.  This project is coming along nicely also as I have been using my CNC machine here at The Tinker's Workshop to fabricate some of the first parts that are key to the design. 


These first four photos are of the vertical support mounts for the internal workings of the Plexi-glass clock. The first photo shows one of these supports on my CNC machine. Both of these pieces turned out beautifully and match perfectly for the design.


The support pieces were then spray painted gloss black on all side and left to dry.  The reason for the black paint will make the display show up better once the clock is fully assembled.


These three pieces make up the back of the inner display case and will be mounted together to form the inner box holding the plex-glass numbered blanks.


These three shots show you why I cut out the first test pieces in styro-foam. This is much less expensive than ruining a good piece of plexi-glass only to find out that something is not right.  Notice in the second photo that there is a diagonal cut in the bottom right # 3 pieces.  This was a perfect example of why I run a test piece before I commit to a final run of my gcode for the CNC machine.  I had an error in a line of code that caused this cut that was not intended to be there in the design.  Time well spent and money saved for sure.
  I'll be posting more photo and possibly video of this project as I progress further with it. 

Video Camera Steadicam

  For most people who are not into making their own movies with a video camera the term Steadicam is something they have never heard of but surely have seen in almost every movie that has been made over the past 10 or 15 years.  This device allows anyone to create very steady shots to get professional results with their video. A good example would be a shot of a guy running down the street and the camera in either following him or in from of him.  If you try doing this kind of shot without the steadicam your video would be bouncing up and down as you ran with the camera.  The steadicam eliminates this up and down motion to give you great looking video.
  I am in the process of making such a devise for my video efforts and have most of the components put together at this point in time. A professional Steadicam can cost big bucks and is way out of my league when it comes to that kind of equipment and cost.  I was fortunate to come across a video online from another website called The Frugal Filmmaker.   I am in the process of building his design with just one little improvement.  The design called for a PVC arm to be built but I thought it would look a lot more finished if I made a composite one using fiber glass.  I will post photos and the use of this devise once I am farther along with it's construction also.  Oh and by the way the steadicam will only cost me around $40 or so.  Quite a savings to say the least.


In the meantime here is the video of what it is and how it works from The Frugal Filmmaker website.