

Thursday, December 22, 2011
Thank You!


Monday, December 19, 2011
When I say "Action"...... Roll Camera!
It's been another busy week here at The Tinker's Workshop with another fun project and trying to get ready for Christmas and all the hustle and bustle that it brings. This week I've completed something for all the people that are into creating video for the fun of it like me.
In professional movie making the big guys like Spielberg and Lucas have unlimited budgets and they get to use the latest and greatest gadgets to make their movies really something special. This week I've completed a video camera dolly that is small, lightweight, inexpensive and easy to use. It can be used on a table top and makes difficult video scenes a snap to make.

The video camera dolly was partially created using one of my favorite tools.... The Makerbot 3D printer. The red axle supports between both sets of wheels were printed using this 3D printer. Each section took about an hour to print.

The arm for the little dolly comes from a company named Pico and is purposely built for a dolly like this. They sell their version of this dolly online (without the arm) for $100. This was way more than I wanted to shell out for this little gem so I designed and built my version using the Makerbot for $22. The skateboard wheels I picked up on Ebay for $12 brand new complete with double sets of bearings no less and the rest of the hardware I found at Lowes for another $10. Quite a savings don't you think?

The arm for the dolly is special built and I did not even want to attempt to duplicate it as it is very unique in what it can do. This and the fact that it only cost $28 to buy which I thought was a good deal. To adjust the arm all you have to do is turn the knob with the "PC" on it and the arm unlocks. It then can be positioned in almost any configuration that you can dream up to get you video camera pointed where you want it. The arm is eleven inches long fully extended and is very well made and worth the money.
Here's a video demo that I put together showing you how the video camera dolly works and looks in action. So pull up an easy chair and get your popcorn and soda ready. All I have to do now is call up Spielberg and Lucas and tell them to stand back as I make my next epic video!
Sunday, December 11, 2011
Is It Real Or Is It Blender 3D?
Over the past couple of days I have been busy once again at the QC Co-Lab maker space in Davenport Iowa making more parts for my Makerbot Semi Lowboy trailer. Once I get a few more parts made I will post the latest progress with that project.
In the meantime I have been also working at home on the latest version of Blender 3D. Blender is a great 3D software that you can download for free to create beautiful 3D graphics, full animation and even create your own games. This software even has a full video sequence editing software built right into it. I use it to edit my videos complete with sound, title, and effects editing. Great stuff.
I have been using Blender 3D for around ten years now and I also use it for concept work to see what a project may look like before I even build the first part. I actually did this for John Deere for a time for a new concept that they wanted modeled up faster than what we had previously been using to design with.
Blender just updated it's render engine and so I am learning new things as I always am and have been having a ball with the latest version of Blender. Below you will find just a sample of what I have been up to.

This first image is not a photograph but a 3D computer model I created using Blender's new render engine called Cycles. Pretty amazing to be able to create something that looks this real in a computer. The new render engine is not difficult to use. Just a bit more steps to make it all do it's thing in the computer.


In the meantime I have been also working at home on the latest version of Blender 3D. Blender is a great 3D software that you can download for free to create beautiful 3D graphics, full animation and even create your own games. This software even has a full video sequence editing software built right into it. I use it to edit my videos complete with sound, title, and effects editing. Great stuff.
I have been using Blender 3D for around ten years now and I also use it for concept work to see what a project may look like before I even build the first part. I actually did this for John Deere for a time for a new concept that they wanted modeled up faster than what we had previously been using to design with.
Blender just updated it's render engine and so I am learning new things as I always am and have been having a ball with the latest version of Blender. Below you will find just a sample of what I have been up to.

This first image is not a photograph but a 3D computer model I created using Blender's new render engine called Cycles. Pretty amazing to be able to create something that looks this real in a computer. The new render engine is not difficult to use. Just a bit more steps to make it all do it's thing in the computer.

This little guy on the trike is a concept idea that has been stirring in my head for some time now. The vehicle started out as a pedal powered trike but now has evolved into what could be a full vehicle that runs on gas or electric power. Check out the detail that Blender show in the rendering. Looks about as real as you can get without having it sitting in your garage.

I wanted to see what the concept would look like for real and Blender now has made that possible without spending a small (or large) fortune to get there.

In this image I was playing around with the front suspension and steering set up so the driver had room for his (or her) legs to be stretched out. The first version of this concept was more cluttered and not as clean looking as this one.


In these two images you get a good view of the steering and suspension with and without the driver. This concept could be just a small commuter car or a even just a toy for a small child. When using Blender the computer model can be saved and a new one copied and changed in minutes which saves a lot of time in making modifications to the design. My cargo trailer for my motorcycle (see photos elsewhere on my blog) was created this way. This makes for an easier way to concept out a new design in a very short time.

This is a nice top view of the trike concept. For now this vehicle is a fun idea but the concept has a long ways to go and still has a lot of bugs in it before I would ever consider building it for real. But with Blender it gives me a good idea of what the finished vehicle (or at least the frame) will look like long before I decide to spend the time and money to actually put it on the road.
If you have not yet looked into using Blender 3D I suggest that you do so by checking it out and other images that I have here on my blog. The software can be downloaded for free online by going to Blender.org for the latest version which now is at rev 2.60. There is also a nice set of beginner instructional videos online at BlenderCookie.com which will get you started using this wonderful and fun tool to help you concept your next project. Worth a look for sure!
Thursday, December 8, 2011
Makerbot Semi LowBoy Trailer Construction Has Started

For those of you who have not been following my blog for the past few weeks this entry will get you caught up with my Makerbot Semi build that I have been working on. I have completed the assembly of the Semi tractor and the UFO (see earlier posts) and am currently working on printing out the Lowboy trailer for the complete model using the Makerbot 3D printer. I have been compiling some interesting data on this build over the past couple of days. So far the number of hours I have spent just printing the UFO and the Semi tractor has exceeded 80+ hours. I have also gone over my computer model that I used to design the complete model and the grand total of parts in the model will be almost 500 pieces. The best calculation that I can make on the total amount of time it will take to print out the complete Lowboy trailer is another 60 hours. But all of it is fun so it is another labor of love.

In this image is the computer model of the Lowboy trailer by itself. It is 23.8 inches long with a triple rear axles made from aluminum rod. With this trailer the total length of the Semi/Lowboy trailer assembly will be 30.5 inches long.


These two images are of the rear chassis of the Lowboy trailer with the axles and wheels mounted. This will help you better understand the progression of photos to follow below.

The Lowboy chassis for the rear wheels is made up of three separate main sub-assemblies. Each section took a little over an hour to print and I was happy they turned out so well. In black they are perfect for the build.

These "U" shaped connector pieces are what will be used to hold the three main sub-assemblies of the frame together.


With two of the chassis sub-assemblies flipped upside down I slid the "U" connector over the two mating cross pieces and snapped it into place. The fit was nice and tight and no glue was needed to hold it all together. I designed mounting holes in the "U" connectors to run plastic filament through to hold this portion of the assembly together. It was so tight that the holes were not needed. You would break the parts if you tried to take them apart at this point so my design worked out better than I had hoped.

A very nice looking assembly and 3D print job at this point.


As before another chassis sub-assembly section is added to the build at this point with another "U" connector to make a nice clean looking rear chassis.

Very tight assembly with good stiffness. The rear chassis portion of the Lowboy is complete at this point. It is 2 inches wide by 5.5 inches long. As pictured it is only 1.5 inches tall. Not a big assembly but nice detail just the same.

Here I've added the axles that will be used in the trailer. They were made from polished 1/4 inch aluminum rod and cut to 4.5 inches in length. The tips of each rod were then drilled out to accept a cotter pin to hold the dual wheels on each side. With having to print the twelve wheels for the rear chassis assembly it will take roughly another 15 hours of printing on the Makerbot. I will hold off on that portion of the build until the very last of the assembly of the Lowboy. All the wheels will match on the Semi so it will look really good. Look back at some of my earlier posts to see the Semi tractor build and the completed photos of it with the completed UFO.
Thursday, December 1, 2011
Makerbot Semi Tractor Is Completed After Marathon 40.73 Hours
After what seemed like months, today I have completed my Makerbot Semi Tractor. I counted up the hours and it comes to a staggering 40.73 hours of printing. This total does not include the design time nor the assembly time to put this portion of the model together. But I am not complaining in the least as it has been a lot of fun so far creating this little beast. The Semi at this point stands 7 inches tall, 4.5 inches wide and 10 inches long. The following photos show the wheels being installed and the photos of the completed Semi now has the air dam on the top of the roof also installed. The air dam alone took four hours to print. But I think it was all worth it.

In this photo are two of the three axles that I made using 1/4 inch aluminum rod. I drilled out the ends of the rods so that a cotter pin could be installed in the axle to hold the wheels on. This made for a much stronger assembly though I think the Semi could still be done using wooden dowels and then just glue the wheels on to the axles. A small end cap was originally designed for this purpose but again I thought the aluminum rod was a better way to go.

Lots of parts for the wheels had to be made for this porion of the assembly. Each wheel is made up of three parts. The tire, an inner hub (either red or black) and a white rim. It was a very tight fit which was like snapping Lego block together..... no glue was needed as it was a very good fit.

This is a good shot of the front wheel with the cotter pin installed. I added a small washer behind the cotter pin so the wheels actually roll.

Here I am test fitting the rear dual wheel assemblies for the Semi. This part of the build was easier than I had expected and that is always nice to have happen in a big build such as this.
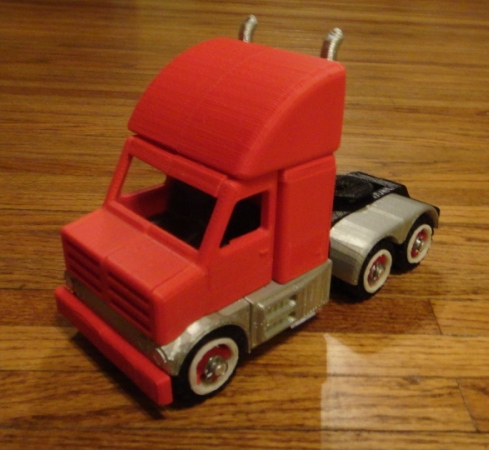

The wheels really dress out the Semi with the red inserts and the white rims!

I really like the red tail lights in the rear bumper of the Semi. A lot could be done with this model as my friend Neil had pointed out that I could have put LED headlights and tail lights in the model. I told him he can do that when he builds his Makerbot Semi.


These two photos give you a good idea of how big my completed Makerbot UFO and Semi really are. The UFO is 10 inches in diameter. I had not posted photos of the completed UFO so if I missed it here it is again.


The original UFO had a Makerbot solid printed dome on the top. I replaced this with a clear plastic dome and a complete interior with seats, controls and instrument panel. Makes for a much more interesting model.
Next on my plans for projects will be Lowboy trailer that will go along with these two models. The completed model of the Semi with the trailer will be 30.5 inches long and have a special carrier on the trailer that will enable the UFO to be carried on it. I think the trailer will be simpler to assemble than the Semi tractor has been but the amount of time to print it will also add up very quickly. This should be interesting to see how it all turns out and the number of total hours it will take to complete this large model. I'll keep all of you up to date on my progress so keep checking in from time to time and you'll see my progress.
Subscribe to:
Posts (Atom)