Monday, September 24, 2012

More Colors For The Blender 3D Electric Car Model

My brother and I last night were on Skype for some time discussing the Blender 3D model of my electric car design.  We both agreed that more colors were needed to decide what would be best in a model or the real deal.  With this lengthy discussion was the idea of having a car in red, dark red, and bright yellow.  With Blender 3D this is an easy task to change color but still takes a little time to get little details in the computer model to look right.  Lighting plays a big part in this process along with some changes that needed my attention concerning the model itself. I did not like the original windshield that I had shown you here with the blue model of the car. The windshield just did not work for me so I spent some time with the redesign and came up with what you see here.  Something that looks to be actually possible and still look good at the same time.  One other change that I saw with the computer model was to have the roll bar supports showing in the design.  It looks good but in reality this would take some doing to get it built into a real car.  Possible but probably not easy.  I like the look though and that is what counts here.
  The whole process of coming up with three more colors for the computer model only took me a few hours and once again gives you a good idea of what can be done using Blender 3D software.  For those of you who have just found my website here Blender 3D is a free modeling and animation software that you can download online.  It has a steep learning curve to use the software but there are numerous tutorials for beginners to get you started.  I had to slug through this process over 10 years ago when the software was still quite new.  It has improved greatly since that time and a lot of great features have been put into the software to be able to compete with the big boys like Maya (an animation industry staple).  It has been gaining ground every year  since it's creation by remaining open source.  This is where Joe Average like me and you can contribute ideas to the makers of Blender and actually improve on it.  Great software for creative types like you and I.  
  So with out going any further, here are the new colors for the electric car model that I pulled together in just a few short hours time.  


This dark maroon color is my favorite of the bunch.  Very classy looking I think.


Red is always a good color also for a car but I think it needs some white accents.  Stripes might be nice down the sides.


This bright yellow will surely get the attention of other drivers on the road so you are less likely to blend into traffic.  Being such a small car at only 12 feet long and 42 inches tall it may not be a bad idea to go this route with the color.  Also with these images I played around with different colors for the interior of the car.  Easy to do with just a click of a computer button and a few tweaks to get the color the way I want it.

  Fun  ideas to play around with using Blender 3D.  A great tool to learn and use in the creation of new concepts such as my electric car design.  What's nice about this example of using the software was that I could use the model over and over again and only change the color but still get the same images again and again with out having to recreate the model each time. Much more detail can be put into the images you see here but for now this gets the message across and works for me once again to sparking new ideas farther down the road for this project and others that come up along the way.   Enjoy the images.

Saturday, September 22, 2012

A Body For My Electric Car Model Using Blender 3D

This past week or so I have been playing with building a body for the electric car model that I just completed only a few weeks ago.  This is a long and slow process to create a fiberglass body for such an interesting and detailed model. This can be tedious at times but fun at the same time. Sometimes my ideas for such a project as this I want to show off quicker and what I've found works the best for me is to create my ideas on the computer using Pro-Engineering software.  This is ok but to make it a lot more interesting and polished looking I then take it a step farther and send the files to Blender 3D software to really start getting my ideas across.   With Blender 3D I am able to refine my ideas of what a finished model or even a real electric car would be like.  My dreams come to life using Blender 3D and if you have not learned how to use this great software yet I strongly urge you to do so. Jump in and take the plunge.  Your efforts will be rewarded by being able to make your ideas come to life  even if only it is on a computer screen.  With this in mind here are a couple images of my idea for  a body for my electric car design.  Someday I hope that this vehicle will actually roll down the road. Until then these images help me get my ideas across to everyone here.  Enjoy.


Sunday, September 16, 2012

80 MPH Excitement At The Tinker's Workshop

Yesterday morning I was awoken at the ungodly time of 4:15 am to the sound of what I could best describe as a house being blown up by a very large explosion.  This luckily was not the case but I was not very far off in my thinking this is what happened.  I ran to my window to see nothing much out of the ordinary other than my neighbors stirring just as I was and a few people talking on the street.  I went down stairs to look out the back of my house to find a very beat up yellow Audio parked and smoking at the curb.  Along side the car was a young man on a cell phone talking to who I assumed was 911.  I thought first that this car had been hit or at least side swiped by another car and it had crashed further down the street.  Within minutes the Police had arrived and more neighbors had appeared in their bath robes on the street looking at the wreck behind my house and farther down the street.  My view looking out my kitchen window is limited and I was unable to look farther down the street because of the garages I rent next to my house. I thought about the situation for a couple of minutes and being as I was not dressed and did not want to get up  at such and hour decided to go back to bed.  The police had everything under control and I was none the worse for wear so I climbed back into bed and drifted off.

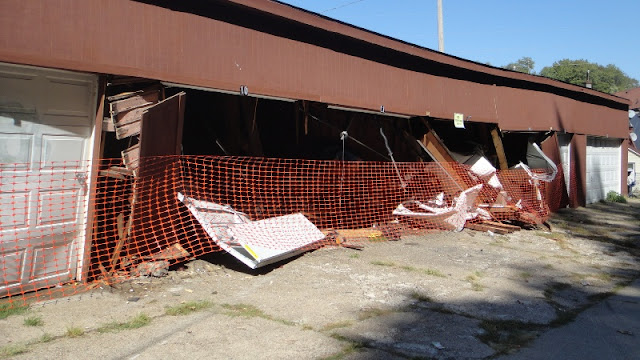
  Several hours later when the light of day had arrived and I was fully rested I got up to investigate what had happened during the very early hours of the morning.  By this time it was 8:00 am or so and the reminders of what had happened during the night were still very visible on the street.  Oil marks on the road where the yellow Audio had died, skid marks across my sidewalk, lawn torn up a bit, more skid marks and to my shock and amazement very little left of the garages that I store my Mini Cooper, Goldwing motorcycle, hand built kayak, and my hand built motorcycle trailer.  The garages are or should I say were numbed from seven to fifteen.  I rent number seven and eight and the drunk driver destroyed garages nine  through fourteen.  Just missing my garages by a couple of feet! The good Lord was watching out for me as nothing in the garages was damaged and I still can get the garage doors open and closed without any problems. 

  The drunk driver came down my back street at what was estimated to be 80 mph.  The car hit the curb just in back of my house crashed into the garages wiping out everything that was in them.  The car then spun 180 degrees pointing it back in the direction it had come.  The drunk tried to escape the accident by driving the wreck away where it died behind my house.  He then tried to run away on foot and was captured by the police some time later and is now sitting in jail wondering I am sure as to what all the fuss is about.  

  Due to all of this happening the garages now will either have to be torn down and rebuilt or repairs made to the already old structure to try and salvage what is left of the building. I vote for new garages as these were smaller than what I really need and the bigger garages would be a blessing if and when I buy a larger car than my Mini and want more room for other projects from my workshop. Not sure how this will all turn out yet as it will be some time before the owners of the garages gets the contractors, insurance people, and the city officials together to sort the entire mess out so things can somewhat get back to normal in my neighborhood once again. 

  So this is the whole story and since a picture is worth more than the words I have typed here I give you what is left of my garages and thank the Lord for smiling on me once again.


 The two garages closest to my little white house are where my Mini Cooper, Goldwing motorcycle, custom built kayak and motorcycle trailer are stored. A very close call to be sure.  If the drunk had hit the end of the garage it would have wiped out everything that was in my garages plus probably set  my house on fire and the rest of the garages to the ground.


When the car hit this portion of the garage it sounded like a bomb had gone off in the neighborhood.  Scary to say the least.


The yellow parts laying on the ground are some of the parts of the front end of the yellow Audi that caused the damage.


 The green that you see in this photo is actually a Kawasaki motorcycle buried under what is left of the garage.


 Another view of the garage looking up the street. 


 Oil now stains the sidewalk and street where the drunk tried to escape the scene of the accident.


 In this shot you can see a skid mark where the car landed after it went airborne before hitting the garages.  It's amazing that the driver walked away from this disaster. 

Normally I have excitement in my life by completing a big project that I have planned and worked on for weeks or months and that is enough to make me happy.  This kind of excitement I can do without just as anyone else could.  There may be a blessing in disguise with this accident once all of the paperwork and rebuilding and the dust has settled.  Not sure what it is yet but I am hoping for either brand new larger garages or maybe even the chance to buy the property and expand the Tinker's Workshop along with brand new garages.  I can only hope.  Just will have to see how it all turns out in the coming months.  Just thankful that my garages were not destroyed and no one in the neighborhood had been killed.  I'll keep you posted. 

Tuesday, September 11, 2012

What does A Toy Robot Spy Spider Have In Common With A Skyscraper?

  Sitting here at my computer today and planning my next big project I came across an old TV show online that I watched as a kid.  The show was named "Johnny Quest".  This was an action adventure animated TV show in the late 1960's for those of you to young to remember.  In one of the episodes there was a robot spider that a villain had built to spy on Johnny Quest's scientist/inventor father.  I remember the episode well and liked the robot spider so much that I decided to make one on my Makerbot 3D printer. This is what I came up with.


I think this little project turned out very well in only a few hours of design and making parts.  The little model only has one metal part in it.  This is a 1/4 inch bolt that holds the body of the spider to the leg mounts in the middle.  It is pretty well hidden in this photo and that is the way I wanted it to turn out.  The model stands 4.5 inches tall and 8.5 inches diagonally from foot to foot.  The body of the spider is 2.25 inches in diameter. 
  What does this have to do with a skyscraper?  It all turned out to be built exactly like an old time skyscraper in the way it was constructed.  In skyscrapers girders are put together with steel rivets that are flattened out to join pieces together.  I originally was going to make all of the joints in the spider metal and had the pins all cut only to find that they were more than a little difficult to install without breaking the legs in the process. A brainstorm occurred and I thought why not rivet the legs together.  


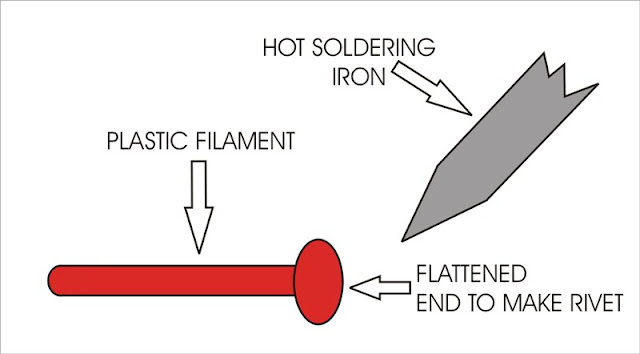
I used some of the plastic filament that the Makerbot 3D printer uses to make the parts as material for the rivets.  I inserted the plastic easily through the mounting holes of the parts and took a hot soldering iron and melted the tip of each end of the inserted filament to flatten it out to make the completed rivet. This worked out perfectly as the joints are still movable and the flattened ends hold the rivet in place.  This also gives the spider a good look and is cheap to make or repair if needed. 
  This little spy spider will make a nice little knick-knack for my computer desk to remind me of years gone by when I dreamed of adventure, inventions, and tech stuff yet to be created. Now being in the 21st century a lot of the things I dreamed about are sitting in my workshop or being created by designers like me in our spare time. Thank you Johnny Quest! I'll remember the inspiration that you've given me every time I see my spy spider on my computer desk.

Sunday, September 2, 2012

First Year Anniversary!


  Today I celebrate the first year anniversary of The Tinkers's Workshop blog site.  It has been quite a year with all of the projects that I have designed, built and completed.  Everything from a Makerbot 3D printed 1/6th scale electric car model to a CNC machine build, a platform bed, gyro-copter kite and much more.  To say I have been busy is an understatement to be sure.  All of it has been great fun and a real learning process during many of the projects.  

  I wish mostly to say thank you to the almost twenty-six thousand visitors (as of this morning) that have spent the time to see what my site is all about and spread the word to others that I have something interesting to share.  Without all of your visits, comments and advise my site would not have grown as much as it has in this past year.  It gives me great pleasure and encouragement to continue on to make my site bigger and better with each passing month. I hope all of you continue to follow along with me on my various projects and take the time to let me know what you think of my efforts to share what I am  dreaming of, designing and building.  Keep Tinkering!

Sincerely,

Dave Langkamp