Having just completed my work table spray booth project I'm now able to get back to work on my motorcycle custom cooler that I started back in October. For those of you who have not been following the blog for very long, I started work on a custom cooler for my Honda Goldwing motorcycle. The trunk of the bike is a good size but I could not fit a small cooler into the trunk along with a full coverage helmet. So the project was born. I got to the point of the project where I knew that I would need to paint it and winter was already well on it's way so I set the project aside until the spray booth was completed.
Here's a couple computer images of the final design for what I've called the "Micro-Cooler". The hinges that you see here are my own design that I printed using my 3D printer. They are a bit of overkill but I think they look good just the same. The original hinges that I had purchased for this project just did not work as well as I hoped so I made these replacements and I'm happy I did.
I got the Styrofoam cooler parts cut and glued together, then sanded all of the edges smooth to give it the shape to match what I had designed in the first photos.
The hinges turned out great and so no more work was needed on this portion of the project. Again the design is a bit more heavy duty than I need for this little cooler but I think the look is great so I'll leave them the way they are.
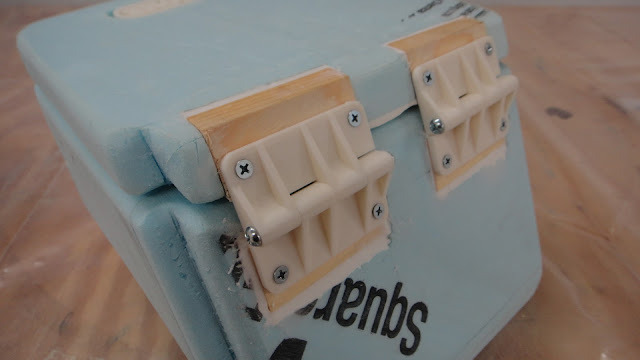
In order to mount the hinges I first needed to make what I call "Hard Mounts" for the lid. This is simply done by cutting out part of the foam on the lid and then mounting in wooden blocks and sanding them into shape to match the shape of the lid.
Then I mounted the hinges in place and marked out the hard mounts for the cooler box itself. This way I would be sure that I had the lower hard mounts exactly where I needed them to secure the hinges properly.
I took my hot wire tool and bent the wire to remove the Styrofoam so I could install the lower hard mounts. The fiber glass that I had laid up inside of the cooler could not be cut with the hot wire so it made this step in the project simply a matter of removing enough foam for the hard mounts.
Here in the photo I've attached the lower hard mounts to the hinges and puttied the mounts into the cavities that I had made to secure them. I placed the cooler on it's front face to keep all the parts where I needed them while the epoxy resin cured. The photo above shows the cooler upside down so the lid is on the lower portion of the photo because of the coolers' position on the work table.
After the hard mounts had cured enough I filled in any voids around the mounts with more resin putty mixture and let the mounts sit for another day.
To get the name plate into the lid of the cooler again I designed it so it could be mounted into a cavity that I had made for the 3D printed name plate. This will be bonded into the cooler lid once all of the fiber glassing , sanding and priming of the lid have been completed. Then I will again lay in an epoxy resin putty mixture to fill any voids around the name plate. Once I am happy with the installation of the name plate I will paint the entire lid white. The final touch will be to paint the letters for the name plate in black. A simple process with a small paint brush should do the trick.
Lastly here is the cooler just starting to be painted in the new spray booth. The cooler at this point had been completely fiber glassed inside and out and coated with the resin putty mixture to start the smoothing process before final paint. I am happy at this point as this is the hardest part of the project. At least it seems like it to me anyway. I will completely prime the cooler lid and all inside and out several coats at least. Sanding and filling any imperfections that I find along the way. By the end (I hope) it will turn out just like my computer image that you first saw in this post. It will take a bit of doing but I know I will get it to my liking and will be more than happy when I do. I'll post the final results of my efforts to keep you up to date.
The spray booth by the way works perfectly and the addition of the turn table makes spraying parts a breeze. So that's about it for today.
The spray booth by the way works perfectly and the addition of the turn table makes spraying parts a breeze. So that's about it for today.
Have a good day in your workshop and good luck with your latest project as well.


Awesome! No words. You always go one step beyond.
ReplyDeleteThere is so much great, useful information here. Thank you! Thank you! Thank you!
Read our guide if you wish.
themotorbiker blog
Thanks again :)