The Tinker's Workshop has always been in need of a sign in the shop to be proudly displayed when I showed off the shop as well as the projects in my videos or personal tours that friends and family have enjoyed. Today this project has finally been completed after many months of waiting for warm weather to get the painting done on the project in my garage. Here is how the sign looks in the shop along with how I put it all together.
Ever since I put the workshop together I wanted a great looking sign to put the icing on the cake so to speak to show the space off just that much more. With the success of the blog being what it has become it was only fitting to use the logo from the blog's home page and recreate it as sign for the shop.
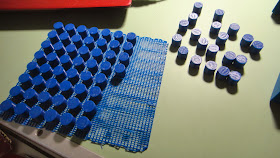
I started as usual with my computer and modeled up all of the letters that were needed for the sign in Inventor 3D software. I laid the logo for the blog into the software and recreated each letter one by one and figured out what scale I wanted the sign to be. The largest letters are four inches tall and were printed on my Makerbot 3D printer during the winter months when there was a lot of snow on the ground and way to much cold to even think about trying to do any other work in the garage. As you can see from the photo above a couple of the letters (K and P) are a different shade of blue than the rest. This being because I ran out of blue plastic in mid-project and had to use what I had on hand. Needless to say the parts did not match. So painting was called for at a later time.
I didn't want the letters to be just attached flat to the background board so I also printed up little spacers that would be glued to each letter to move the letter away from the background and give a nice effect at the same time.
Lots and lots of little spacers were epoxied on to the backs of each of the letters. It looks like a lot of work but this step in the project took only five or ten minutes at most. The white around the spacers did not matter as once the sign was mounted on the wall the epoxy would not be seen.
Once the epoxy holding the spacers on to the letters had cured over night I then could spray paint all of the letters the same color blue. The spacers also made this portion of the project easy as it was a simple task to have the letter stand up on their own while the painting was being done in my now nice warm garage.
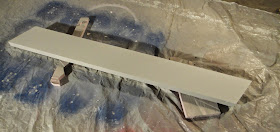
Next came the process for building the background board for the sign. It was made using 1/4 inch plywood for the face of the background. The photo above shows the build underway with the attachment of one of the outer rails to give the piece strength as well as definition for the sign.
The largest piece of 1/4 inch plywood I had on hand was only 48 inches long. As the sign had to be 58 inches in length a 10 inch piece of additional plywood had to be butted up to the first piece and then a backer plate was glued into place to secure the pieces together.
The upper and lower rails for the sign were glued and clamped on to the plywood using wood clamps. I then used small wire brads to nail the assembly together and removed the clamps.
The ends of the background assembly were then cut at a 25 degree angle using my miter saw. Additional wooden pieces were than cut and fit between the outer rails. These were then glued, clamped and nailed into place to finish off both ends nicely.
Here are a couple of good shots of how the background assembly looked once the clamps had been removed from one of the ends of the piece. The background piece is 7 inches tall and 58 inches wide.
I counter sunk all of the nail holes next and used wood putty to fill them in and let everything dry over night.
This is how the nail holes looked once I sanded the assembly the next day. Much better looking than having nail holes showing for sure.
Next came a couple of coats of primer.
Then a couple of coats of bright yellow paint.
Then yellow/orange paint.
Then the final coats of light brown paint. To do the transition between the colors was just a matter of eyeballing the paint as I went until I was happy with the result.
I let the paint dry on the assembly for a good day and then brought the it back into the workshop to figure out how to mount the letters properly. What I did was lay a 2 x 2 on the face of the assembly making sure to align it to the lower edge. Once this was done I put a piece of painter tape on top of the 2 x 2. As the 2 x 2 is really only 1 1/2 inches wide and the letters being four inches tall this left exactly 1 1/2 inches of space at the top of the letters so this would center them perfectly. Next to the tape I laid down a four foot metal ruler so I could mark out the tape for the letters.
I had once again used my computer to give me the exact locations for each letter by measuring from one edge of the assembly to each letter and transferring these measurements to the painters tape. I also marked down what letter should be at what mark. This way the letters could be moved against the 2 X 2 to keep the name lined up and the marks would keep the spacing looking good.
Once I was happy with the placement of all the letters I once again used more epoxy to mount the letters to the background assembly.
With the sign being hung on the wall the epoxy around the newly mounted spacers on the letters would not show unless you were directly under the sign and looking up at it. So I was happy how I managed to get all the letters on the sign mounted correctly without much hassle.
As you can see here I hung the sign over top of my workbench which is the first thing that anyone would see when coming into the shop. It will make a nice background for the video presentations that I do from time to time for the blog at the shop as well. The new sign gives the Tinker's Workshop just a bit more of a professional look even if my workbench needs a good cleaning right now. No matter as I can at least scratch another project off of my to do list once again. If you want a closer look just click on any photo and it will give you a better view. Enjoy.


