Thursday, June 27, 2013

Inexpensive Recumbent Trike Cargo Box

  I put the finishing touches on the cargo box for my recumbent trike this morning after doing a little shopping at Walmart yesterday.  This is what I came up with for very little money.


I originally was looking for a milk crate but could not track one down without having to travel a great distance or pay more than I wanted to for shipping online.  This little cargo box I found at Walmart for $7.00 so it was just what I needed.


I turned the box upside down and found that it has a nice flat bottom to it.  On this I printed two brackets that hold the bungee cords in place once I had bolted them to the box using 10-24 hardware and large flat washers on the inside.  The brackets are spaced so that they fit between to cargo rack tubes when mounted in place. When the cargo box is strapped down it does not slide and is held securely with the bungee cords.  The box also can be put on to the trike or removed in under 10 seconds so I don't have to have to carry it when I am just out getting some exercise. 


The cargo box also came with a snap on lid so I can carry something securely without having to worry about it flying out of the box.  But mainly the purpose of the cargo box for me is just to be able to pick up something at my local grocery store if I need it in a hurry and not have to fire up my car to do so. 
  The red locking clasps at the top of the box are also a good highlight that will make the trike just a little more visible.  So I'm all ready to leave my car in the garage when I need  a loaf of bread and a gallon of milk from my grocery store a few blocks away.  One less vehicle burning up fuel for a very short trip, saving a little money along the way, getting some exercise, and doing my part to save the environment.  I call that another good idea all the way around.

Sunday, June 23, 2013

A Color Matched 3D Printed Cargo Rack For My Recumbent Trike

In my last post I showed you my newly acquired recumbent trike.  With the new trike I found that I wanted a cargo rack for it as it would come in handy if I should need something quick from my local grocery store not far away.  I have spent the week creating just such an accessory.


I found a rack for my trike online which would have been perfectly fine but if you know anything about me or my blog this simply would not be the way I wanted to go.  I started design work on the cargo rack as soon as I got the trike assembled and tweaked so that it rode and drove the way I liked.  I then grabbed my tape measure, caliper, and note book and gathered measurements of the rear end , seat, and frame of the trike. Then on to spending a lot of hours using my design software to work out the design that was in my head. Burning the midnight oil so to speak.


This photo shows the main components of the cargo rack before final assembly.  On the right of the photo are the two main platform rails with four mounted connectors on each aluminum tube.  The drilling of the tubes to align everything correctly was an effort to be sure but with a little time and a lot of patience I was successful.  The two upper assemblies that look like sling shots are the support arms that mount to and hold the platform up. The lower ends of these assemblies are mounted to points on both sides of the frame near the rear axle. These assemblies have a double metal flange on the bottom for   a nice strong simple mount. The next smaller assembly (middle bottom of photo) are the connectors that mount the platform to the same mounting points used for the seat supports.  The last three tubes on the lower right are the cross tubes that completed the platform assembly.


Here the cargo rack is fully assembled and ready to be mounted on to the trike.  I wanted the aluminum tubing to be black as this would match nicely with the rest of the trike but I also knew that to paint aluminum was not the way to go.  Instead I wrapped the tubes with black vinyl that had a sticky back to it. This worked out perfectly and if the covering should every get damaged it is just a matter of peeling off the old vinyl and putting new on again.


The entire cargo rack is assembled using standard 10-24 hardware and only took me around ten minutes to mount it on to the trike.  This is where all the planning and computer time paid off.  Gotta love it when a plan comes together first time out.


All of the yellow components of the 10 x 14  inch cargo rack were printed using my 3D printer with  a 25% fill.  Normally when I make 3D printed parts I only use a 10% fill.  To explain this further all parts on a 3D printer are not printed solid.  This would be a 100% filled part.  Instead the parts are made with a lesser fill percent to save plastic and time. Most of the time 10% fill is more than enough to make the part strong enough for the project you are making. When the parts are printed it looks like a honeycomb inside to give the part strength instead of just having a hollow part which would be a very weak part. The percentage of fill I use depends on the strength of the part that is needed for an assembly.  With this  project I thought 25% fill would do the trick.  This made the parts very strong and the entire assembly should hold more weight than I would every want to haul on the trike.  Speaking of weight the cargo rack only added an additional pound and a half to the trike.  This was icing on the cake as the rack only cost me around $28 to design and build compared to close to $70 for a factory model.  As usual with all of my designs and projects bragging rights are priceless!


I figure the heaviest thing that I would bring home for the grocery store would be a gallon of milk. This comes in at 8 lbs 11 oz.  Not a terrible amount of weight but still heavy enough.  I want to work on a cargo box that will attach to the cargo rack.  The one stipulation with the box though is that I want to be able to remove it when I am just out riding my trike for the fun of it.  Why carry along dead weight if I don't have to?  For now this little cargo rack makes a nice addition to the trike and I can always just strap what I want to carry on it until I figure out a cargo box or trunk for it.

Sunday, June 16, 2013

Project Possibilities With A New Recumbent Trike


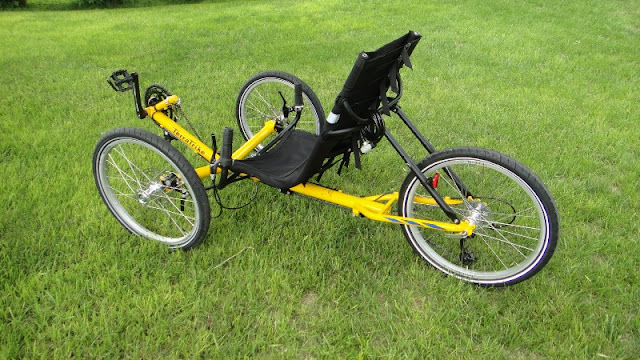
This past week I bought a new recumbent trike that I have had my eye on after I had lost my hand built recumbent in a fire last October. This little 24 speed chromoly framed TerraTrike is a blast to ride and I have only put a couple of miles on it and I find that I already want to put a speedometer on it to see just how fast and far I travel with it.  This turned out to be the project for the day. 
  So the first thing I did was buy a good looking speedo from Walmart and figure out where to mount it on the trike.


The first idea I had was to mount it on the handlebars like any other bike.  This was not a good idea simply because in order to see the speedometer I would have to look almost straight down while cruising down the road.  Not a good idea to be sure at 25+ miles per hour. What I needed was to be able to see the speedometer without having to look down. So on to the next idea.


I thought "How about mounting the speedometer on the front derailleur tube?"  The problem was that the mount for the speedometer was made for handlebars that are horizontal and 90 degrees opposite of the direction of travel.  The derailleur tube as you see in the photos above is angled and 90 degrees opposite of the speedometer mount.  A new mount needed to me designed and made.  So I rolled up my sleeves today and came up with something new.


This is the design I came up with.  It has a split mount so that it can be easily mounted to the front derailleur tube and a cross mount for the speedometer.  I even was able to remount the front deflector to the speedometer mount so a lot of head scratching was going on today to get this worked out on my computer. After printing the parts on my 3D printer I was able to mount it on to the trike using standard nuts and bolts.


Here the new mount is put into place next to the front crank.  This bolted up easily without a problem.  Strong and solid. With the speedometer being as light as it is I really did not need a heavy mount for it.  


Next the center cylinder for the speedometer mount is slid into the upper openings of the mount.  This is held in place with a cover plate, bolt and inserted nut on one end of the mount.  This then gives me the horizontal side to side cylinder like the handlebars only up in front where it needs to be.


The speedometer is then mounted to the cylinder and the front white deflector is mounted to one of the uprights with a mounting hole in it . This again is all held in place using standard nuts and bolts. All that is needed to do yet is to route the cable with the wheel sensor on the end of it to one of the front wheels and strap it down with zip ties to get a reading of the speed and distance traveled.  


Here's a good shot of the speedometer as seen from the driver's seat.  The big "Zero" is the speed readout as I was sitting still. So as you can see it will be much easier to read than before where you looked forward to drive and then straight down to check your speed.  A vast improvement to say the least.  Once the speedometer is turned on I do not need to touch it again as I drive down the road.  When I stop the trike I then can get odometer readings, average speed, top speed, trip odometer, and even the time of day.  So it will be a nice addition to the trike. 
  

I have a couple more ideas for my little TerraTrike that I want to work on.  One is a carrier for the rear of the bike so I can take the trike and get groceries from time to time.  I am lucky that my local grocer is less than a quarter mile away from me.  Why fire up the car when I can take this and not have the cost of burning up gas?  I have some larger project ideas for the trike but I will hold off on saying anything more until I can see if they are even possible. So stay tuned in the future as I am sure you will enjoy seeing what else I come up with.  You know me.... lots of different projects here at The Tinker's Workshop.

Monday, June 10, 2013

Fine Tuning My Solsylva CNC Machine With New Upgrades

Now that the CNC enclosure is completed the task for today was to get my Solsylva CNC machine up and running again.  If you have not been following the blog in some time I will get you caught up now.  While I was in the process of building the enclosure for the CNC machine I was also planning new upgrades to the machine itself.  What I did was to make the machine taller by 3 1/2" to have more travel in the vertical axis.  This would allow for the cutting of thicker pieces.  I also modified how the top guide tubes were mounted to the horizontal 2 x 4's.  


In the original design the tubes were mounted using threaded rod that mounted to the guide tubes and then were slid into holes in the 2 x 4's and each hole then had a recessed pocket at the bottom side.  This made it more than just a little difficult to zero the table out so that you would end up with a flat surface to mill on.  


With my new modifications I kept the idea of the threaded rod for the guide tubes but made them longer.  5 1/2 inches long to be exact. This allowed me to add an additional nut to the under side of the pipe and eliminate the recessed pocket at the bottom of the 2 x 4's.  I then could rotate the second nut under the pipe to raise or lower it to adjust for a zero reading on the cutting table. Once the correct height has been reached I lock it down with a lower nut and lock washer on the bottom of the 2 x 4's.


Using this little gauge I was able to zero out the table top in what ever location that I wanted.  


Normally this gauge would be used on an all steel CNC machine.  But being as mine is mostly wood I added a little jumper wire so the when the cutting bit touched the spring loaded top button it would light up.  From Mach3 CNC software I then told the computer that at this point make the "Z" axis (the vertical axis) be a reading of 0.000.  I then moved the gauge to the next location I wanted to check and compared the difference in the reading from the computer.  With the additional nuts that I had installed it was only a matter of turning the nut clockwise or counter clockwise to raise or lower that portion of the upper tubes. The gantry (which rides on the guide tubes) also raises or lowers. After doing this process in a half dozen places on the table I am happy to say I now have a level table top. Or should I say have the gantry parallel to the table. This is done so that when you cut or engrave a part it will all be cut at the same depth no matter where the bit is cutting. 


These parts are the original leadscrew gantry arms that also needed to be modified for the improvements I made on the CNC machine.


These gantry arms attach to the leadscrews and move the gantry along the "X" axis on the machine when the leadscrews are rotated by the stepper in the rear of the machine.


 I increased the length of these arms by 3/8ths of an inch.  This had to be done because of the additional adjustment nut that I installed under the guide tubes ended up raising the gantry and the original parts no longer would mount to the machine.  Once these  parts were remade to the new size the machine was set up correctly and ready for use once again. 


Now with the computer desk along side it's just a matter of loading up the files of the parts that I want to cut on the CNC machine and make them.  I also did a sound check with the new enclosure.  I put a decibel meter to the machine. The sound level with the doors open and the router running full tilt the meter read 100 decibels.  With the doors closed the sound decreased to 87 decibels.  To put this into perspective an automobile reads 80 db at 25 feet away and 90 db for a motorcycle 30 feet away.  A diesel truck at 30 feet away will read 100 db.  So it a good thing to have the sound deadening foam in the new CNC machine.
  The last thing I need to do yet on the CNC machine is to make sure  that the gantry is aligned from side to side so that when you cut a square part it will be square when you put a gauge to it.  Just a matter of doing a few test cuts and tweaking the gantry so both sides match.  So I am very close to getting the machine dialed in once again. Like having an old friend back in the shop and ready to work at a moments notice.

Saturday, June 8, 2013

Finishing Touches On The CNC Machine Enclosure

The last couple of days I have been varnishing the CNC enclosure part by part.  Eight doors, enclosure frame, enclosure stand, and enclosure top.  Lots of dismantling, varnishing, and reassembly.  This alone has been quite an undertaking with all of the varnishing to be done.  I ended up using almost a half gallon of polyurethane on the assembly but it has been worth the effort along with all the other details that you will see here.


After all the varnish had dried I installed the sound deadening foam.  Here is a good shot of just a small piece of the foam.  Installing the 33 square feet of foam into the doors and top panel turned out to be the simplest thing to do in this project.  I simply laid out the one foot squares where I could and then cut smaller pieces with a scissors where they were needed to fill the smaller voids.  Once a door was set up with the foam I pulled all the pieces out and then sprayed in contact cement on the door and the foam parts. After a couple of minutes the glue had become tacky and it was just a matter of putting the foam back into it original location. Fast and easy just the way I like it.


Here is a  couple of good shots of the enclosure top panel with the foam installed along with the electrical lighting that I found was needed in the enclosure. I was able to install and wire the lights on the work table and test them out before putting the enclosure top into place. I simply had to remove the light bulbs and lift the top into place with the fixtures already in place. This took a little effort to do as this top panel is large and heavy.


Here is a photo of the enclosure once again assembled without any additional lighting. The first thing that I noticed with the enclosure was the shadow below the router.  Not a good thing as it would always block the view of the bit cutting parts.  Also the enclosure as I suspected became much darker because of the charcoal gray sound deadening foam.  This was not a surprise.


Now with the lights installed into the enclosure it is much brighter and easier to see the work table for cutting or engraving parts.  The shadow that was below the router head now is gone.  A big improvement.  The close up photo is what you will see looking through one of the front windows when milling parts.  A nice view!


This is a good shot of the enclosure closed and lit up with the new lights.  I installed four 60 watt florescent bulbs which turned out to be more than enough lighting for the project.  Each of the lights are wired together so all are lit at one time.  The power cord plugs into a power strip for the machine and it all comes to life once a switch on the power strip is tripped.
  The CNC machine now in the enclosure is a tight fit to be sure.  But I can already notice a sound difference in the enclosure just by sticking my head in to it to make adjustments to the machine.  I will put a sound meter inside and out once I get the CNC up and running again to find out how much the sound has changed because of the enclosure itself and the sound deadening foam. Should be interesting to see what kind of a difference it will make. 
  With the enclosure ready to be used with the CNC machine I will next put my efforts into completing the plans that are 90% done so that I can get them out on the plans page here.  I'll put together a post just as soon as they are ready.  
  One last thing.  The enclosure should stand up to almost anything I can throw at it.  This thing is heavy.  I thank my lucky stars that I put casters on the enclosure.  Even with them it takes a bit of effort to move it around the shop.  Luckily this is something that I will not have to do on a daily basis.  No matter what this addition to the shop will be a great to use with the CNC machine.  Enjoy the photos.


Thursday, June 6, 2013

Always Expect To Make Revisions With Your Projects

This week has taught me that there is never a time when a project is ever really completed.  Point in case is the CNC Computer Desk that I thought was ready to use four months back when I put the last coat of paint on it. I was wrong.


  I was sure that it was exactly what I needed until yesterday. The desk will be used for my newly redesigned CNC machine and it's enclosure.  With the PC tower placed on the lower platform of the CNC enclosure stand I am not able to plug the monitor into it. The cable to connect the monitor is way to short to reach.  So a revision to the desk needed to be made.


The simplest thing to do is to have the tower inside the desk with the addition of a new lower deck and a 2 x 4 brace to support it.


The lower platform only took about twenty minutes to add to the computer desk and now gives the computer tower a great place to be stored along with anything else that needs a place to be stored.  It also solves the problem with being able to connect the computer to the CNC machine and the monitor at the same time.  An additional plus to the upgrade is the fact that I can now unplug the computer desk easily from the CNC machine and move the desk out of the workshop when I am not using it.  
  So I learned another lesson today.  Never say any project is completed until you plug it in, power it up, and play with it a while. Even then you just never know what changes can or will be needed to make it better.  Moral of the story.... keep an open mind when it comes to your projects and ideas.  I know from now on I will here at The Tinker's Workshop.


Tuesday, June 4, 2013

The CNC Machine Is Coming Together Once Again

With half way decent weather today I was able to make a big push on the varnishing that needed to be done on the newly constructed CNC machine enclosure.  I removed all of the doors and the top of the enclosure and moved these parts to my garage where the varnishing will continue over the next few days (dry weather permitting) until they are ready to be reassembled on to the enclosure frame.  While these parts were drying today after having already put several coats of varnish on them, I got my CNC machine installed into the new enclosure.  Here is what it looks like.


The enclosure frame and base that you see here have already been varnished and so now was a good time to put my Solsylva CNC machine finally into it's new home.  As you can see it fills the open cavity of the enclosure with little room to spare.  I had to double check that all of the stepper motors, gantries, and wires would not bump or snag anything while running.  So far everything has still got the green light to look like it will all work properly.


The CNC machine is resting on four rubber pads that I made from a one inch thick rubber tile that I found at the local hardware store.  I cut the tile down to make four six inch squares to keep the machine off of the platform and hopefully reduce the vibration and ensuing noise that can come from it. 


Here's a good shot of the right side of the machine and the wiring that needed to be routed to the computer that will run it.  I gave myself a good sized opening mainly because of the fittings on the end of the wiring that need to be plugged into the computer are rather large.  They slid through this opening with ease.  Both of these wires are for two of the three stepper motors that make the CNC machine move in different directions.  


I was more than happy to have the doors off of the enclosure while putting the CNC machine into it.  The machine base is 38" wide and the opening on any side is 43" wide so there was not a ton of space to guide the base into the enclosure but enough to get the job done without fancy foot work to get there.   The cord hanging down on this side of the machine is the power cord that runs to the router itself.  It also had to be routed through a bottom hole in the base of the enclosure. I'll have to make sure all of my connections can be made without to much trouble also.  You can also see in the photo two orange rods that stand vertically at the top of the CNC machine.  These rods hold up the wires for the top stepper motor and the router so that they do not drag on the parts that are being engraved or cut while running the machine.  This is the reason why the enclosure is as tall as it is. 
  It's a good feeling to be finally looking at the end of this project.  But there is a lot of little things that need to be done to get my CNC back up and running again.  It's been over eight months since I last used it so I will have to relearn how to make it work when I get to fire it up once again.  I also will be able to put the sound deadening foam in the inside of the enclosure and see if I will need any extra lighting too.  But even without the doors on the enclosure it's already pretty impressive just to look at.  Another good day at The Tinker's Workshop!

Saturday, June 1, 2013

Upgrades To My CNC Machine For The New Enclosure

Progressing is being made on the CNC machine and enclosure project that I have been working on over the past weeks.  Today in the shop I was able to put together the upgraded Solsylva CNC machine that I use.  With the newly constructed enclosure I have had to upgrade the CNC machine so that it will work inside it.  


Here is a photo of the original Solyslva machine or at least the base assembly of the machine.  This is what needed to be updated.  The original machine that you see here has a slotted table which works OK as long as you can slide a large washered bolt up through the table so that a clamp can be mounted to the top portion of it to hold down the part you are trying to make.  This simply will not work in the new enclosure.  Just no way to come up from the bottom of the CNC machine.  


Another change that I have wanted to make on the CNC machine was the fact that there seemed to be very little travel in the Z axis (vertical) when I wanted to make parts.  Once I put a sacrifice piece of wood on to the table and then add a one inch piece of material to be milled I only ended up with about a half inch of free travel. Not a good idea. So the travel in the Z axis for the new machine has been upgraded to be 3.5 inches taller.  The horizontal tubes on the top of the base were also modified so that leveling adjustments could be made easier.  The original design was a pain to say the least when trying to zero out the table to make it level on all corners for perfect cutting of parts.  I changed the bolt lengths that hold these upper tubes so that they could be adjusted either up or down to find the correct height anywhere on the table top. Just a matter of a few turns of a wrench. 


I was able to save a lot of parts from the original design.  I then painted any new parts and added a new 1/2 inch piece of plywood to the frame. 


To this plywood deck I then spaced out 1 x 4's that were trimmed down so that aluminum eight 32" Incra miter t-slot tracks could be mounted between them.   These parts were far from being inexpensive but I had no choice to spend the money for them to make the CNC machine work with the new enclosure. Being that the tracks were exactly 32" long was a big plus for me so that I did not have to fuss with them to make them work. 


The parts were then screwed down to the plywood deck and the frame for a nice clean look that will work perfectly in the new enclosure.  I really like the look of the gold slots with the blue and white table top.


The clamps that I had been using with my CNC machine no longer would work with the new design.  Again because there was no slot to go through.  Just the new t-slot. To correct this I designed new base adapters that I made with my 3D printer and would work with the clamps and the t-slot.  


The new modified clamps work perfectly with the t-slot table and are just an upside down carriage bolt which a twist knob and clamp bar are attached to.  This will hold the part to be milled down securely and be much faster to set up the machine than trying to fish it through a slotted table from the bottom. 
  With this done I'm now able to get the assembly off of my work table for a little while and take the CNC machine enclosure apart again so that I can start varnishing it inside an out.  I'll post more photos once this is done and I install the CNC machine into the enclosure and get it set up for the first time.